


6 Stages of Hard-Surface Modeling Characters: Cyborg Monk
While concept artists provide the setup, it's the job of modeling artists to shape the idea into a realistic and beautiful product that remains true to the original design. Marcos Melco adjusted his approach to Jianli Wu's cyborg monk many times, always looking to solve problems and improve the dynamic character even more. Learn how Marco models a hard-surface character below, from his larger strategies to the specific tools and detailing he prefers.
- Choosing the Concept / Preparations
- Blocking Stage (ZBrush)
- Range of Motion Tests
- Retopology in Maya
- Texturing Stage
- Rendering Stage
- Bonus Tips on Maya Tools
 My name is Marcos Melco, I’m a Brazillian 3D Modeling and Texturing artist with 3 years of experience in the VFX industry. I’ve had the immense pleasure of working at Method Studios (2015-2018) and Icon Creative Studios (2018) in Vancouver, Canada. While at Method Studios, I worked on Black Panther, Okja, Captain America: Civil War, and King Arthur: The Legend of the Sword. At Icon Creative Studios, I worked on Disney’s Rocketeer reboot.

1. Choosing the Concept / Preparations
In this article, I’m going to talk a bit about my process of creating the Cyborg Monk character during CGMA’s Hard Surface Modeling for Characters course run by Ben Erdt. At the start of the course, Ben gave us a few concepts of characters to work on. I chose Jianli Wu's concept because l liked the cyborg monk vibe.
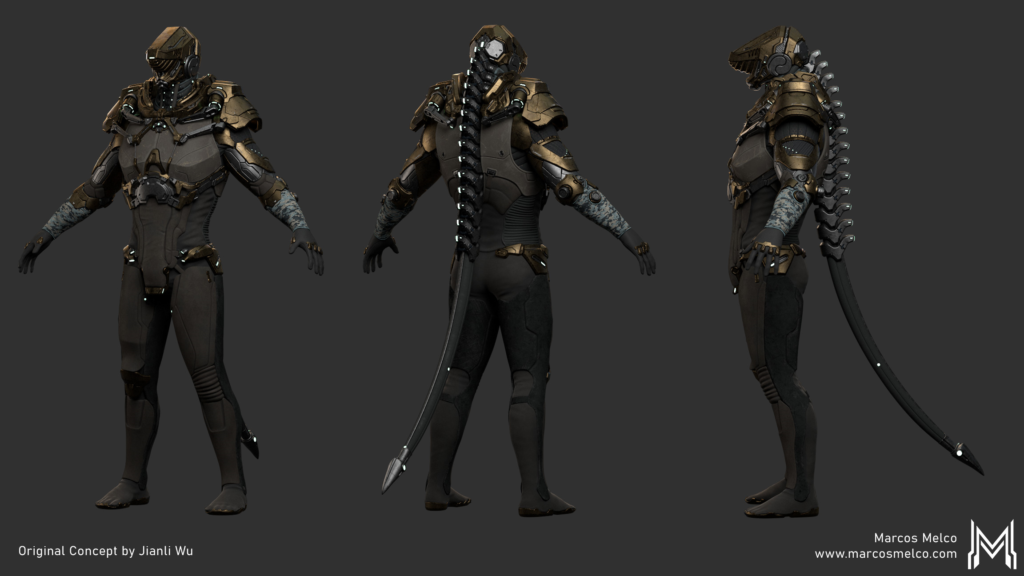
I was interested in the composition of hard armor, which clustered on the upper body, compared to the lighter armor on the rest of the body. It made the character feel quick and skilled.
To prepare for the modeling stage, Ben had us collect references to come up with a character backstory that would help us breathe more life into the design. I also completed a material breakdown of the character. I also did an extra paintover to expose the details the armor is covering.

2. Blocking Stage (ZBrush)
Two important changes I made during the blocking phase were:
- Moved the piston that connects the character's arm to the shoulder armor. Making a piston that works for that arm setup would be straightforward to a seasoned rigger, but I don’t have that skill set, and I didn't want the majority of my time spent on this detail.
- The tail vertebrae were organic-looking, morphing along the spine gradually into other shapes. I didn’t have the time to model each one to make that transition noticeable so I changed them to 3 simpler designs and manually scaled them along the tail
I’ve started in ZBrush, blocking the body proportions, quickly reapproached topology and made some edits in Maya, then moved it back to ZBrush to start the armor sculpting. A good trick to making sure Maya and ZBrush scene match is having your top subtool as a ground plane, which provides a reference of scale and position.
The retopo body mesh gave a source to extract costume parts from. Later in rigging, I 'skinned' this base mesh, then transferred the skin weights to other deformable costume parts. The costume sculpting was done using the old-school ZBrush Dynamesh workflow. To create new parts, I either duplicated the base mesh and slice the parts I don’t need (Helmet, Chest armor) or use mesh extraction or panel loops to create thin meshes (Arm plates, Leg armor).

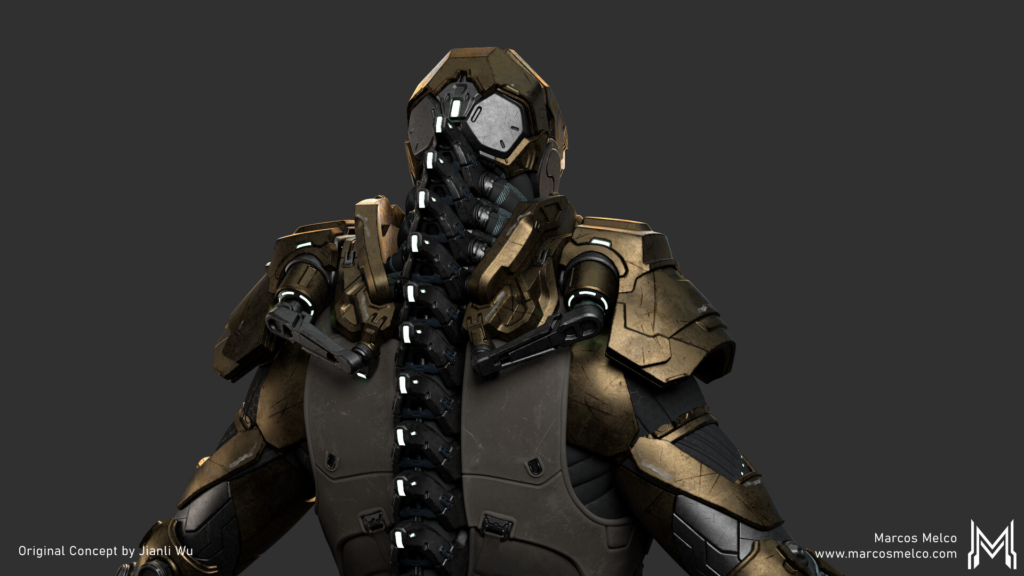
One thing I have to comment on before we move to retopology is how I botched the proportions of the character. His chest is too wide, the armored collar is too high, and the shoulders too small. It makes his torso look super long. The character looks fantastic in up-close shots but when you look at the character as a whole you’ll know what I mean. It’s too late to fix it as it would take too much time to do it properly.
3. Range of Motion Tests
For motion tests, I broke the model into parts and built a rig to see if the model could move around without severe crashing. This character could move with freedom as long as the clavicle didn't rotate forward or upwards too much. In hindsight, I should’ve changed the design a bit by moving the border of the Chest armor inwards, giving the arms more freedom of movement and reducing deformation if the character was to be animated.


4. Retopology in Maya
For this project, since I was going for a Sub-D ready character, I moved to Maya and added more details directly in my final mesh. Sometimes, I returned to ZBrush to block more details since it allowed me to work without the distraction of topology.


The main tool for retopology is Quad Draw on a live mesh. If the shape from ZBrush is really clean you can do the whole model using mostly Quad Draw. But sometimes it’s better to poly model the small details. Another way of getting started is Zremesh then GoZ into Maya. Starting from scratch always takes time, so getting ahead with Zremesher and cleaning-up in Maya is also a good tactic.

Experiment with Zremesher on your meshes with Polygroups and Keep Groups on. Play with Smooth Groups slider for better results.

I
f you want to learn how to streamline your modeling, explore CGMA course Intro to Production Modeling
5. Texturing Stage
Substance Painter can create great-looking materials quickly. You can make great textures only using its presets, but take your time to create distinct materials and blend your grunges for a unique product.
I started by splitting the character into two files to help Substance run quicker and keep my file sizes smaller. One file had the metallic armor, the other had everything else.
I created my maps for V-Ray 3.6 so I used the Non-PBR (Physically Based Rendering) spec/gloss setup in Painter. In simple terms, Specular maps will tell V-Ray how shiny the pixel is and Glossiness tells us two things, the size of the highlight and how blurry the reflection is.
IOR (Index of Refraction) is also very important for most materials and can be texture-mapped but i is a better practice to use a Vray Blended shader and a mask map and control the material aspects in their independent shaders. You get more control that way.

Good UVs are a huge help during texturing. There are a few guidelines that will pay off when texturing.
- Separate the UDIMs by materials.
- Every line should only contain UDIMs of the same type of material when possible.
- Texel density should be kept the same across the same material. It’s fine to scale shells up to fill a UDIM with free space. Just make sure the texture scale matches across the model.
- If some materials don’t occupy enough UV space to fill a full UDIM and also not visible enough to be scaled up, it’s fine to group them together in one UDIM. Keep the shells of the same material clustered together and give enough space between groups for easy selections in the texturing software.
- The cost of using many UDIMs is an increase in render times, so be as efficient as possible but from my experience, the VFX studios see render time cheaper than artist time. So plan your layouts for faster texturing and with a resolution to spare. You never know if the Director is gonna change a shot and bring your asset closer. If your textures hold up when changes happen, if nothing needs to be redone it will make your leads and production very happy.
My process in Painter was to set up whole materials (texture sets of diff, spec, gloss, normals) procedurally in the Fill layers. Layer them one on top of the other and reveal the edge wear, scratches and so on by using the powerful mask generators. Nothing new really.

One step that I could’ve done to improve my textures is painting masks for my scratches. If you look closely there are some scratches that wrap perfectly around the geometry. Those never happen in reality and really detract from the quality of the textures.

Struggling to achieve convincing textures? Read "Below The Surface – Quick Tips For Better Texturing" to get ahead.
6. Rendering Stage
V-Ray's base shader is really easy to use. I used a Vray Standard Material for everything. Most of my materials only needed the maps plugged in and they worked. No remapping nodes needed, yay! There is no shame in remapping your textures though! It’s recommended actually. (For those who don’t use Maya remapping nodes have similar functionality to using HSV, Curves, and Levels on your texture sets.)
The “gold” Metal got a bit more attention. I made two specular maps for this material, as I’ve shown in the Texturing part of this article. The first specular works just like a regular spec map, the second specular map was used to fake an iridescent oily-like sheen for an additional breakup. To blend those, I stacked the shaders using the usual blend node and a VRayFresnel node to mask the oily sheen. The idea is that the first spec map is used on highlights but at certain angles (surface normal starts pointing away from the camera the second spec gets displayed).
I also used a similar setup for the cloth undersuit. I duplicated the shader and in one version made the diffuse map slightly brighter. Then using the same setup as for the gold shader I blended them together using the VRayFresnel. This setup gives a velvet-like result, I just toned it down to keep the cloth feel without drawing too much focus on it.
Final Product


7. Useful Maya Tools
While creating this breakdown, I realized there are many Maya tools that I’ve seen people overlook. Hopefully, there is something new for you here. Some experimentation is required.
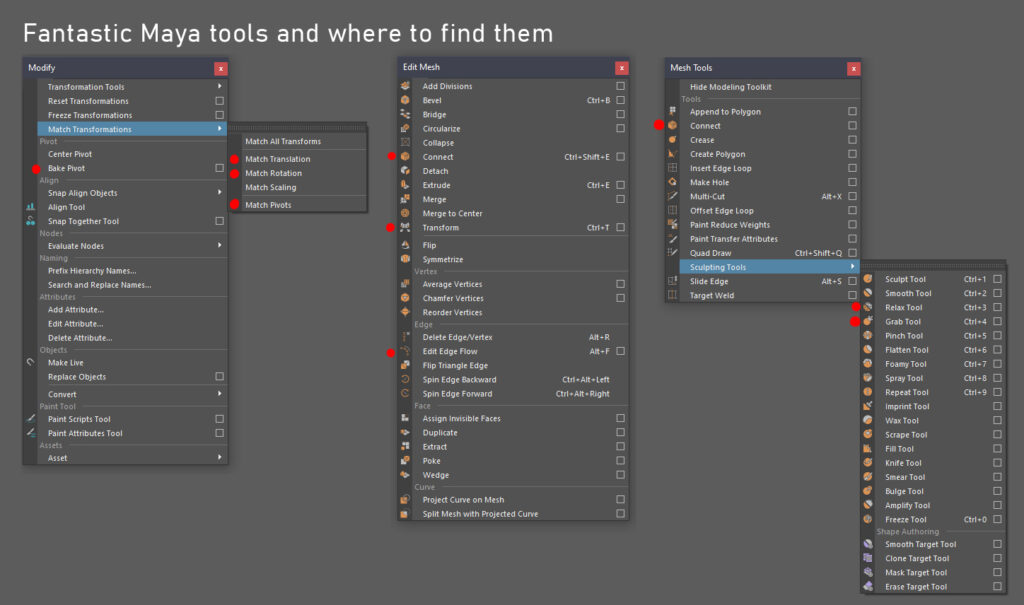
Modify Menu
For the Matching Tools, select the target objects first then the object that will be the source (matched to).
- Match Translation, Match Rotation - These tools allow matching the translation and rotation of new objects to the selected target object.
- Match Pivot Moves the pivot to the source object without changing transforms.
- Bake Pivot This one is the best tool. Bakes the translation and rotation of the pivot current position. You can snap and orient the pivot then get that exact transform values. Very useful to get the transform of an object during blocking phases.
A combination of Bake Pivot, Match Translation, and Match Rotation allows blocking mechanical moving parts quickly. Matching also assists in the placement of bones and locators during the rigging step.
Bake Pivot also helps you to move the symmetry plane when in object mode. Ever wonder why sometimes it doesn’t work even if the pivot is in the correct position? It’s because you didn’t bake in the pivot transform values. It took me ages to figure that one out and I’m still mad about it.
Edit Mesh
- Transform - Allows you to move components along its normal. Works kinda like inflate in ZBrush. Super useful to change the thickness of cables or extrusion heights after you cleared the object history.
- Edit Edge Flow - It averages the selected edge loop based on the neighboring edges, this is my favorite tool to get smooth curved surfaces quickly.
Edit Edge Flow

Mesh Tools
- Connect - Creates an edge between 2 vertices or an edge loop along the midline of selected edges.
- Multi-Cut - This one is super useful as well. You can use it to insert edge loops or draw panel cuts in an existing mesh. Just go nuts with making cuts and clean the edge later.
- Sculpting Tools - If you ever used Mudbox, these brushes work in a similar way.
- Grab Tool - Works just like the move brush in ZBrush. You can use it to change shapes or just move vertices to even out the spacing.
- Relax Tool - Quickly evens out the surface vertices with minimal shape loss, remember to keep it away from supporting loops and corners.
Ready to give these tools a try? Check out Intro to Maya to build your foundational skills
Final Thoughts
- First of all, this industry is full of artists who are brutal with themselves. We shouldn’t be, but we are. I have a bit of Imposter Syndrome (that feeling of being undeserving of your job position or praise). Being a technical-minded person, I’m always second-guessing myself. I didn’t get rid of this bad habit yet but I’m trying to. So I took this course because I wanted to see how the real pros go about it and move my own skills in the right direction.
- One reason I took this course was Ben Erdt’s art. His personal work is full of characters with great design, insane detail, but the most important aspect of it is that he makes them production-ready. Ben’s work is functional, it can be rigged and animated. As a production artist, those are the skills I want to master.
- I was very pleased to find that my workflow was similar to Ben’s. I still have a lot to learn to reach his level, but I’m hopefully on the right track. He helped me reinforce what I was doing right but also taught me some new ways of doing things, pointed out steps that most artists skip during the design process and made me realize the power of some techniques I was aware of but to my detriment, didn’t really use.
- This project was a really good ride. I think I came really close to Jianli Wu’s concept. The biggest challenge is always converting the 2D concept into a working 3D model, solving the hidden parts and making sure the character can move with its costume. After that, follow the course and with patience finish the character.
- If you are considering taking Ben’s course, make sure you are comfortable around ZBrush and your favorite 3D modeling package. There is a lot to learn from Ben and you wouldn't want to waste time struggling with software issues. If you are comfortable with the basics I really recommend you take it.
RELATED LINKS
If you want to learn how to streamline your modeling, explore CGMA course Intro to Production Modeling
Struggling to achieve convincing textures? Read "Below The Surface – Quick Tips For Better Texturing" to get ahead.
Ready to give these tools a try? Check out Intro to Maya to build your foundational skills.
LEARN MORE
CGMA provides comprehensive instruction for Art, Games, and VFX industries in a variety of courses for a range of students, from 2D and 3D artists looking to supplement their college studies to industry professionals looking to stay up to date on emerging trends and techniques in the field.

