


5 Ways to Make Your Foliage-Filled Scene Believable
Brazilian artist Fernando Quinn's lush forest scene is the perfect example of the benefits of a "work smart, not hard" mentality. Fernando put his time into creating detailed assets, then used Zbrush, Maya, and UE4 to disperse and scatter these assets in ways that don't appear repetitive. See his process, which included:
- Planning the Environment
- Assets Production
- Rock Creation
- Landscape Creation
- Vegetation (Plants, Trees, and Flowers)
 Hello! My name is Fernando Quinn and I am an Environment Artist currently living in Brazil. After three frustrating years in school trying to get a degree in Electrical Engineering, I decided to drop everything and reevaluate my life and career ambitions. Since 2012, I have been learning 3D by myself, studying traditional art, doing some small jobs in the advertising industry, and earning a degree in Graphic Design. Recently, I decided to focus on real-time art for games and I am at the moment looking for opportunities to work for a studio to keep improving on what I love to do.

1. Planning the Environment
This piece was done for Jeremy Huxley’s Vegetation & Plants for Games class at CGMA. While gathering some references and inspiration, I decided to go for a warmer color in my composition. With that in mind, I was able to art direct every aspect of the scene to warmer tones instead of color picking from the references. The lighting with the sun coming down with just a slight angle from the top also helped to set the mood by establishing the time of the day.

Some of my inspirations collected at the beginning of the project, also with my initial color key.
2. Assets Production
When I started this, I wanted to create a clearing in a forest with an old mill as my main focal point. I started blocking the scene to get an idea of the initial placement of assets and while doing that I ran into a happy accident with a very large rock that ended up helping a lot with composition.

Initial blocking in Unreal Engine, with some rocks and trunks. You can see the mill that I intended to create
The mill block remained in the environment until almost the end of the creation process. I eventually decided that, due to time constraints, I wouldn’t be able to make it in time. It worked because the composition was working really well even without the mill in it. For me, it was really hard to let it go, but I had to and this is all part of the process. It was also very challenging to make this piece since at the same time I was learning all the ins and outs of the Unreal Engine 4.
After the initial composition being established, it was time to create the assets. Every asset in this scene was created by modeling the high poly either inside Maya or ZBrush, then baking down to a low poly and texturing it using Substance Designer. All assets are using tileable materials with the exception of the leaves and branches which I will explain the process more in-depth later.
3. Rock Creation
The rocks were one of the first assets I created for the scene since I needed them to determine a good initial composition. When sculpting rocks it is important to think about scale since these assets will be used with different sizes throughout the environment. Keep microsurface detail out of the sculpt, you will have those in a detailed map later. You can use varied types of alphas and brushes to help you with your sculpt such as Crackle, ClipCurve, Polish, and others, but my main tools for sculpting rocks are using the TrimSmoothBorder brush and a little bit of Crumple brush with a square alpha. Besides that, you should always keep in mind the Primary, Secondary and Tertiary shapes rule, be careful to not over polish your sculpt and also remember to keep flat surfaces around your model.

Rock sculpts in ZBrush
With the sculpts finished, I exported these models as a high poly and also a decimated version to use as the low poly. I imported the low polys in Maya, gave them a UV, and after that was a matter of baking the normal maps from the high polys using Substance Designer.
For the rock texture, I used Substance Designer to create a simple tileable material with three different variations so I could vertex blend them later inside Unreal Engine: one dry/clearer rock surface, one regular mid-toned material, and one darker/wet with some light moss patches on it.

Rock tileables, created in Substance Designer
All that remained after that was setting up a proper master shader inside the engine. Using the ObjectRadius node and multiplying it to your Texture Coordinate, you can set up the tileable material in a way that it scales at the same rate that you scale your rock. I used the rock material normal map as a Detail Normal and blended it with the baked normal map. Then I Vertex Blended the rock materials I’ve created with some moss material also created in Substance Designer and that was it for the rock creation process.

Wet and dry moss materials

Rock master material
Want to apply these strategies to your own assets? Check out CGMA's course Creating Stylized Game Assets.
4. Landscapes Creation
The first thing I did was add some basic shapes of rocks and trunks into Unreal Engine and scatter them to play with composition. This was very rough, everything would be changed later. Then, I exported this basic blockout to ZBrush and there I started sculpting on a plane to “ground” these blocked assets, always thinking ahead of what I wanted for my scene. For example, I knew that I wanted a small river crossing the composition, so I carved the river shape in the plane and determined its position in the scene during this stage.

Landscape in ZBrush
This ZBrush sculpt is seen in the foreground and midground of this piece. For the background, I used the landscape tool inside Unreal Engine to create some shapes that I could work with. This was more about creating something to place the assets on top than shaping the final product.

Landscape in Unreal Engine 4
The texturing process for the landscape started with the creation of the materials in Substance Designer that I wanted to Vertex Paint inside the engine. For this, I used four materials: moss, mud, rock, and leaves.

Mud material used in the landscape

For the leafy ground, I exported the height maps from the leaves I modeled for this environment and in Substance Designer finished the material by blending the height maps and giving it a base color and a roughness. The base for this was just some noisy map blended with a perlin noise to give a bit of a bumpiness to the surface.

Ground with leaves and ground with rocks, used to Vertex Paint the landscape
Get a closer look at texturing in UE4 in CGMA's course Texturing and Shading for Games
5. Vegetation
I separated vegetation into three different types of assets, even though their creation process was very similar: Plants, Trees, and Grass/Flowers.
LEAVES
To determine vegetation, I gathered some references on the vegetation of a specific region in the world that I wanted to portray and loosely base my scene in. This is relevant so that you don’t mix a lot of different types of plants that would never be together in reality, otherwise, things might start looking a bit off.


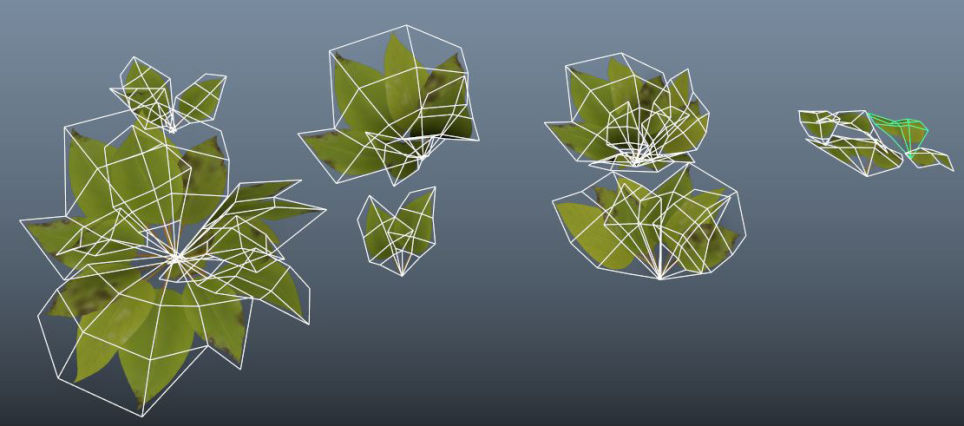
Some of the leaves, after being sculpted, polypainted and layed out on a square in ZBrush
With my reference at hand, it was time to start sculpting individual leaves for some of these plants in ZBrush. My process was basically sculpting the leaves, painting the base color with polypaint, exporting the base color and height maps, and then tweaking the texture a little bit in Substance Designer and also creating the roughness before exporting the final maps. While polypainting the leaves, one great tip that I got from Jeremy was using the Standard Brush with a square alpha and also with RGB turned on in order to paint some damage while already giving some color to these areas. After you’re finished sculpting and painting your leaves, you should lay them out on top of a square plane so you can frame the scene and export a perfectly square map from ZBrush. Then you can bring it to Substance Designer to finish the textures. Note that it is also important to export an opacity map to use later in the engine.

An example on how the final maps looks like, after exporting from Substance Designer
After the maps are created, it was time to bring them inside Maya (Modo, 3DS Max, etc.) and apply the textures on a simple plane. This way you can cut out the individual cards and create different types of plants from your leaves. For some of them, a simple stem was needed to hold the leaves in place. If you need a stem you can create a tileable texture the same way you created the leaves in ZBrush, and place it in the corner of your square plane before exporting the maps. You shouldn’t have a separate texture for the stem in order to prevent more drawcalls for each plant you place inside the engine. Since you are gonna scatter a lot of those around it needs to be optimized, otherwise it can get heavy very quickly.
Learn more about optimizing your environment in our upcoming article, 3 Ways to Create the Best 3D Scene in a Budget Crunch


Plants assembled inside Maya
There was nothing fancy about the master shader created inside the engine. It was just a Two-Sided Foliage shader with a subsurface color again pushing for a warmer tone.

Master shader for the plants
After everything was set up, it was just a matter of scattering the plants around, either using Unreal Engine’s foliage system or hand placing everything if I wanted more precision.
TREES
The creation process for the trees was very similar to the plants. For this scene, I created only two types of trees (a conifer and a smaller broadleaf) and scattered them around. In the case of a dense scenario like this one, it is really difficult to notice repetition if you rotate the trees before placing them next to one another. The first thing was, again, modeling the leaves for the tree, then organizing them on a branch before exporting the textures using the same process used for the plants. I also exported an empty version of the branch on the same texture, so I could have some variation to work with when populating the trees with cards.

Conifer leaf


Branches organized in ZBrush
The modeling of the trunk and larger branches was just some regular extruding inside Maya using splines to guide the shapes that I wanted to achieve for the trees. After that it was just a matter of cutting the cards from the branch texture that was created before and populating the trees in a way that looked natural — remember to always check your reference.

Trees and branches inside Maya
GRASS AND FLOWERS
I started these by making the base shapes inside Maya. I had already established that I wanted red flowers and some clovers in my piece. By using curves and some extrusions, I was able to make both those, and also leaf blades. Like the previous vegetation, I exported these models to ZBrush, polypainted some color, and organized them on top of a plane in a way that I could have some smaller and larger clumps of grass that I could use. I made a mistake making them too thin the first time I created the blades (see image below). After I noticed that I remodeled the grass and made them thicker.

First base models, ended up being too thin
After a quick pass in Substance Designer to get some roughness variation and export the final maps, it was time to cut the cards inside Maya and organize them in varied clump sizes to finish the grass creation process.

Grass and Flowers
Final Thoughts
- Jeremy was an amazing mentor throughout the creation of this environment. He gave me some great advice that helped me achieve the results I wanted. One of the most important pieces of advice that I got was to work on my transitions. He kept telling me that from the beginning, and now I can clearly see how important this is for environment creation for games. It is so important to work on this since abrupt transitioning and straight lines completely break the immersion and look very “game-y”. Make sure you also pay attention to how objects tend to cluster in nature, this is relevant when creating ground textures or when placing rocks and grass around your scene.
- This class was great to learn the entire process used by industry professionals of one of the greatest studios in the world on how they create their vegetation for their games. There are a lot of great software and plugins that help with the creation of trees and plants (such as SpeedTree) but I feel like it is very important to also know how to make this stuff from the ground up. Most of the time you will not have those specific tools available to you and then you will have to do everything by yourself.
- I have always wanted to create an open environment with lots of trees, bushes, and plants, but it can be a little intimidating without knowing how to approach your idea from a technical standpoint. It’s funny because when I started this piece, my initial plan was a lot different from the results. My scene evolved during the process, ideas changed even though the base concept — a forest with lots of vegetation — remained the same.
- Another great aspect of taking this CGMA class is the time constraint you are forced to adhere to. As I’ve shown at the beginning of this article, my initial idea was very different from my results. Due to time constraints, I was obligated to alter my focal point, problem-solve, and figure out ways to make the scene look good even after making changes in the middle of the project. I always want everything to be perfect and this is actually a problem when you’re working under tight schedules. Because of that, it is very important to remember that making your environment look good as a whole is a lot more important than doing that perfect texture or that awesome asset that the player will look at for only two seconds.
- Overall, my experience with CGMA has been great and it is helping me a lot to achieve my goals. I had a great time writing this article and I hope it can be helpful to someone. I would love to contribute again in the future!
RELATED LINKS
Want to apply these strategies to your own assets? Check out CGMA's course Creating Stylized Game Assets.
Get a closer look at texturing in UE4 in CGMA's course Texturing and Shading for Games
Learn more about optimizing your environment in our upcoming article, 3 Ways to Create the Best 3D Scene in a Budget Crunch
LEARN MORE
CGMA provides comprehensive instruction for Art, Games, and VFX industries in a variety of courses for a range of students, from 2D and 3D artists looking to supplement their college studies to industry professionals looking to stay up to date on emerging trends and techniques in the field.


