


How to Create a Warzone: Helicopter Crash
If you want to know the key details that add up to amazing environments like this helicopter crash scene, Freelance Artist Cohen Brawley describes each stage of production, from brainstorming to adding textures.

Hello, my name is Cohen Brawley. I enrolled in CGMA’s UE4 Modular Environments course taught by Clinton Crumpler, to learn the skills needed for creating Environments. I’m a big fan of Military games, so I went for that type of theme. I wanted the scene to be centered around a crashed helicopter, with the feeling of uncertainty and impending doom. Because the environment was so much fun to work on, the scene ended up growing into a much larger scale.
💡 Cohen was 17 years old when He took UE4 Modular Environments and produced this Piece.
First Steps
In the planning phase of my “Urban Warfare” Environment, I wanted to create a scene that would immerse the viewer. The setting was an unknown city in Iraq. I really wanted to work with modularity and vertex painting, as I did not have much experience with either one. I felt it was important to make sure the helicopter and vehicles were accounted for in the environment, so the scene wouldn’t feel empty and the crash site would feel plausible and practical.

I used the Landscape Spline to create the path of the sidewalk, but I wasn’t able to vertex paint on the sidewalk as it was a Landscape Spline. To solve the problem, I created a blueprint spline that allowed me to vertex paint onto it.
References
Trello Board:
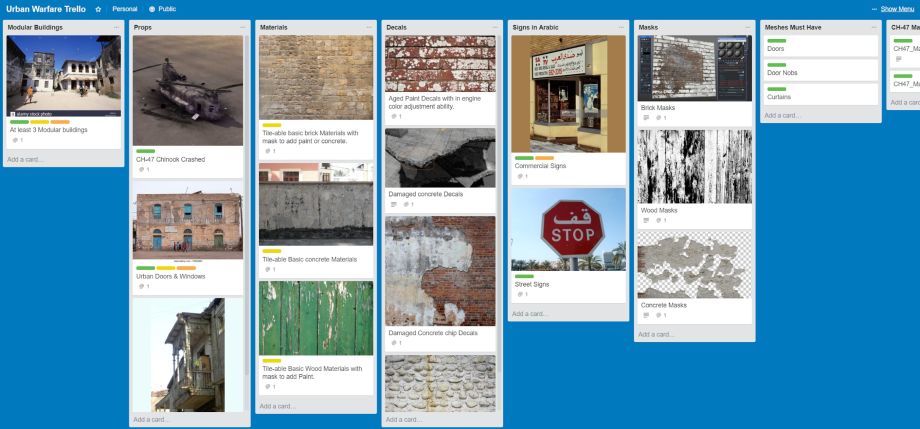
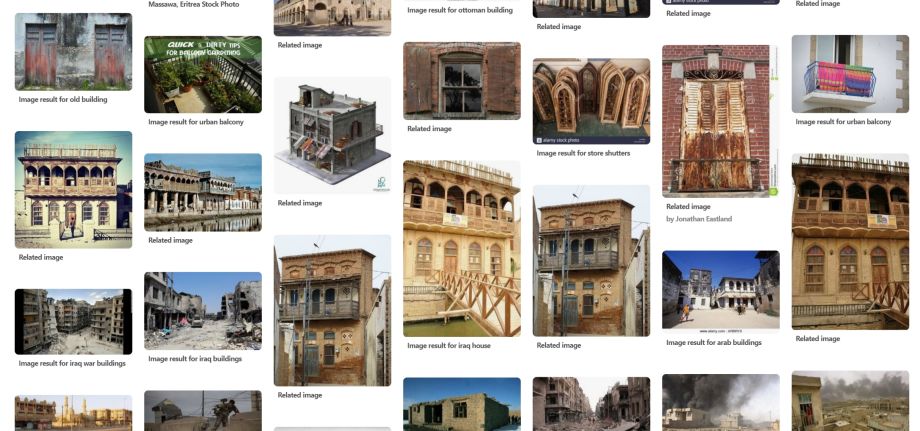
Pinterest Board:
One thing I learned during Clinton’s course is the importance of having a set Time, Place and Story to the environment. To plan the environment and answer questions like: Why did this happen? When did it happen? Where did it happen? Is it sad or happy?
This really helped me set the foundation for the overall scene. I made a Trello board to plan what type of props, decals, and textures I would need for the environment. I also made a Pinterest board to gather reference images. After planning and gathering everything I needed, I began to block out of the buildings and environment.
2. Thinking of a Story
Before I considered the layout of the city, I began concentrating on the type of helicopter I would use for the crash. My first thought was a Black Hawk, but I wanted a larger helicopter that would be more thought provoking as to how something so massive could have come down. I came across the CH-47 Chinook on the web and knew that was the one.
Next, I began thinking about how the helicopter crashed. A helicopter this size can’t just come down with a shot from a rifle. So I knew it needed to be a missile or rocket of some sort. I was considering an RPG – (Rocket Propelled Grenade), but a helicopter this size would not cruise at an altitude that an RPG could reach. So I went with the idea that the back right engine was struck by a heat guided missile. The reason for thinking out such details, is so I would account for the damage needed while modeling and texturing the helicopter. The story also assists with planning the crash landing portion of the scene.
From comics to Modern 2D animation, browse CGMA storytelling courses.
I then consider as to what condition it would be in? I didn’t want the helicopter to be completely disintegrated but yet I didn’t want it to look like it had an easy landing. If the helicopter skid a great distance when it crashed, it would allow me to play a lot more with how it affected the whole street and scene. After considering the details of the helicopter, I began planning the layout of the city as to where the helicopter crash would be resting. I placed the helicopter crash to be resting at an intersection, to give more of a focal point for the environment.
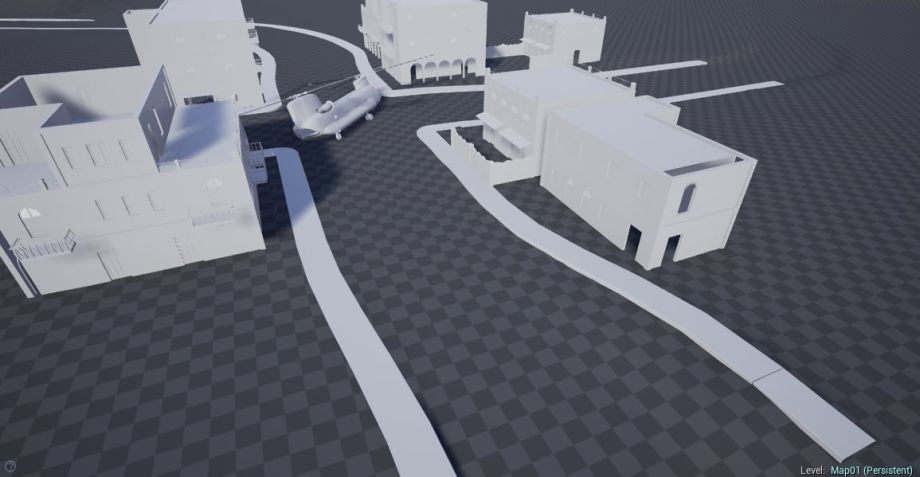
3. Blockout
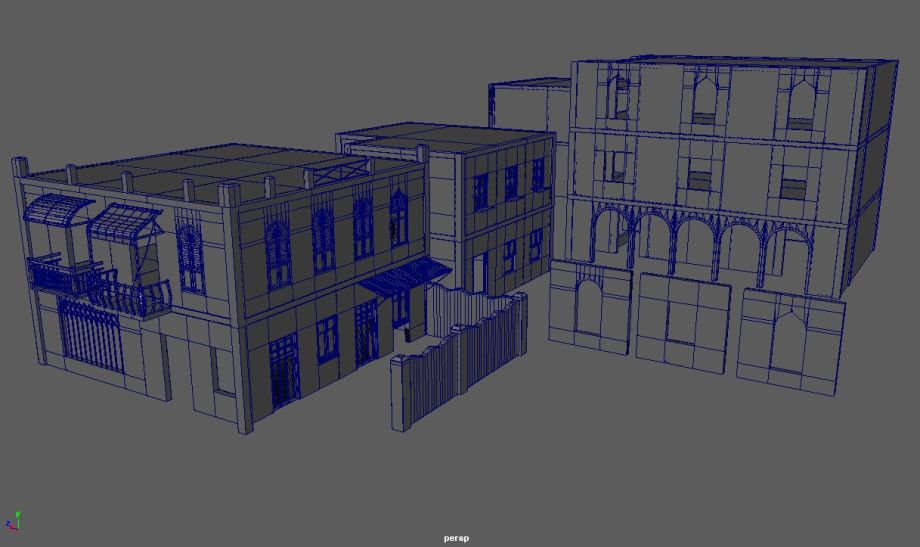
Next, I created the block out of the buildings in Maya. I knew I didn’t have enough time to make every individual building separate modular sets. So I made sure they would be able to share the same walls, doors, and windows. I also made several window and balcony variations to help hide the modularity feel.
Build your software foundations in CGMA's Intro to Maya course
With how large I saw this environment was evolving, I became a bit concerned with the timeframe of 10 weeks. So my focus was to model the helicopter as fast as I could, without affecting the quality of the helicopter. I wanted to make sure that if I was not able to complete the helicopter in time, at least I would have the urban city finished.
4. Textures
Using a lot of textures from Textures.com helped with the tight time frame. I also made sure I was taking advantage of Substance Designer as well. When creating the asphalt road debris I used 3ds Max, but wasn’t happy with the results I was getting. I wanted it to be more sculpted. So I found some basic videos of ZBrush on the web and learned a little bit of ZBrush. I then created the asphalt high poly in ZBrush and decimated it to make the low poly. Then I textured the asphalt pieces in Substance Painter and was much more satisfied with the results.
If you're looking to hone your UE4 skills, explore CGMA's Texturing and Shading for Games.
Finished Project
My Urban Warfare


Final Thoughts
- Clinton Crumpler's “UE4 Modular Environments” course was such an awesome experience. I began his course with very little knowledge of environment building. Clinton was very patient and helpful with my large scale environment.
- The weekly feedback from Clinton helped me to learn and enhance my skills.
- It took around 300 hours to complete the environment for the course. Scale and time frame is probably one of the biggest lessons I have learned here.
- With Clinton’s feedback, lots of work and little sleep. I was able to successfully complete my “Urban Warfare” Environment with the results I hoped for. I had so much fun working on every individual Model, Texture, and Material. An environment this size probably shouldn’t have been attempted in 10 weeks by one individual, but as they say “Go Big or Go Home”!
- I have become a big fan of CGMA and the classes offered. It’s such an awesome opportunity to be taught by industry professionals who know their stuff. The confidence of knowing that the information and skills I am taught are of AAA standards is flat-out priceless.
RELATED LINKS
From comics to Modern 2D animation, browse CGMA storytelling courses.
Build your software foundations in CGMA's Intro to Maya course
If you're looking to hone your UE4 skills, explore CGMA's Texturing and Shading for Games.
LEARN MORE
CGMA provides comprehensive instruction for Art, Games, and VFX industries in a variety of courses for a range of students, from 2D and 3D artists looking to supplement their college studies to industry professionals looking to stay up to date on emerging trends and techniques in the field.
