Forest in UE4
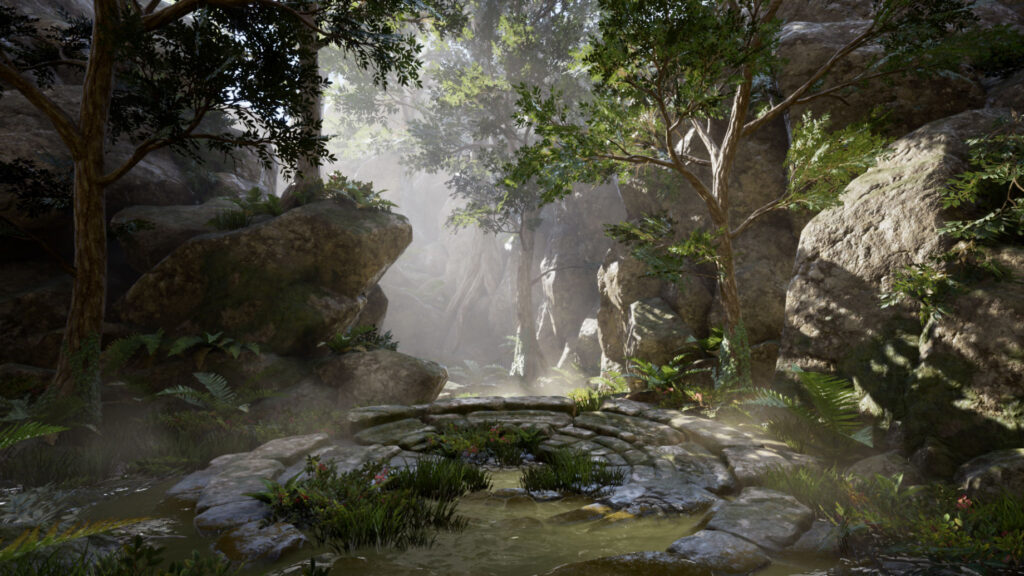
Eduard Grechenko kindly shared a greatly detailed breakdown of his environment made in UE4 within the CGMA course Vegetation & Plants for Games lead by Jeremy Huxley: rocks, vegetation, materials in Substance Designer, lighting, and more.
Introduction
Hello everyone! My name is Eduard Grechenko, I’m an Environment Artist from Kursk, Russia. I don’t have a formal art education, most of my experience comes from working on Allods Online and Skyforge at Allods Team studio where I learned from incredibly talented and skilled professionals.
Goals
When I signed up for the CGMA course Vegetation & Plants for Games, I decided to focus on learning how to make everything from scratch, without using scanned assets directly. I used them as references and color sources a lot, though.
The course turned out to be a game changer for me. It would take me so much longer to achieve these results (if at all) without taking it. I definitely improved my sculpting and texturing skills, learned a lot of new techniques and got many useful tips from Jeremy with weekly feedback on my work and during QnA sessions.
UE4 Forest
Getting Started
As the main reference, I decided to use this photo I’ve found on the internet.
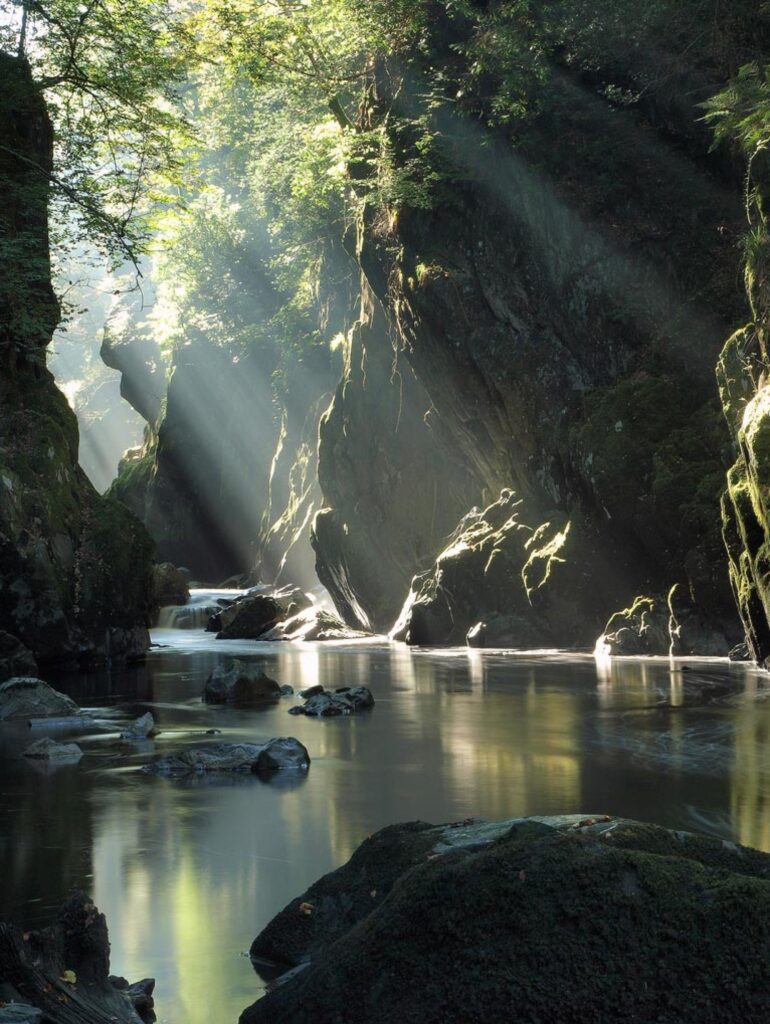
I use Pureref to work with reference sheets. It automatically groups images for you, works fast, doesn’t produce heavy files and has a lot of nice features to make your life easier.
Blockout
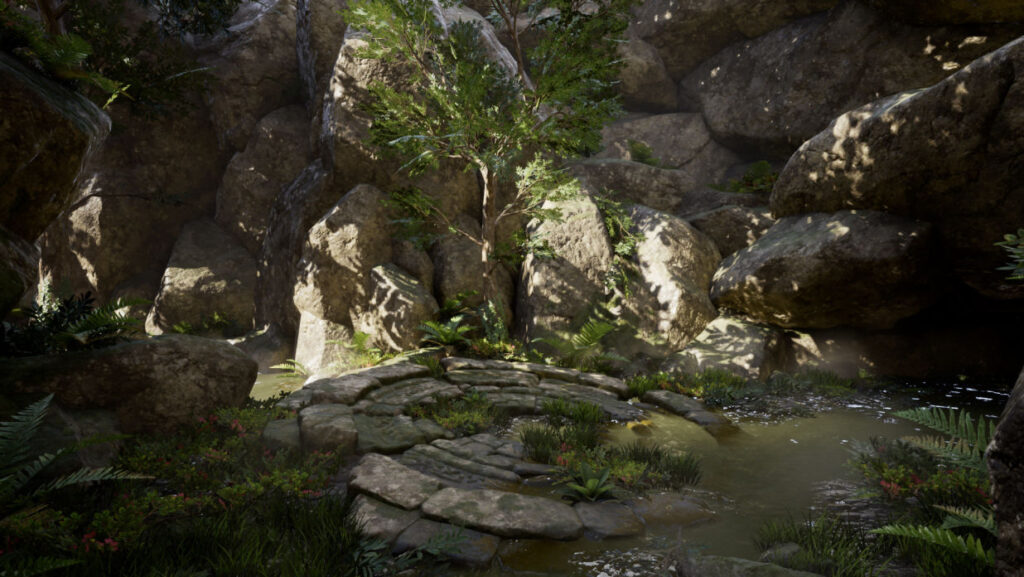
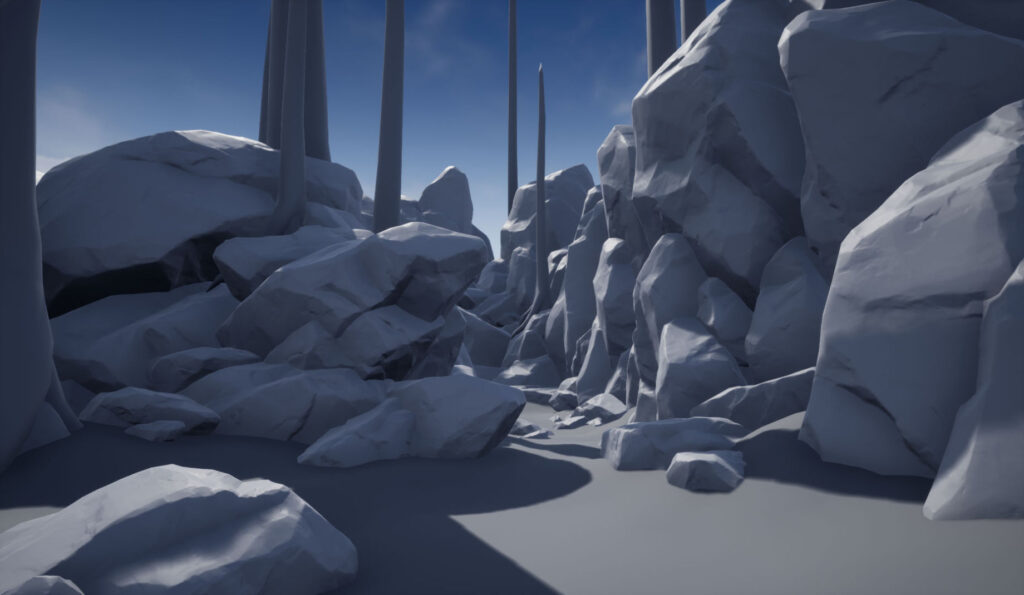
The base of the scene is made of a single rock model duplicated many times, a very simple terrain and a water plane.
The blockout was done in Unreal Engine. It was a bit challenging to build everything with a single model and I ended up making a larger group of rocks to cover background areas more quickly. It helped to have large and small rocks clustered together a little. I made a couple of small round rocks at the very end to make the transition between ground and water more interesting.
Crafting Assets
ROCKS
The sculpting of the rocks has been a big challenge for me for a while. After studying the subject for some time, I learned that the key components here are silhouette, shapes, and composition.
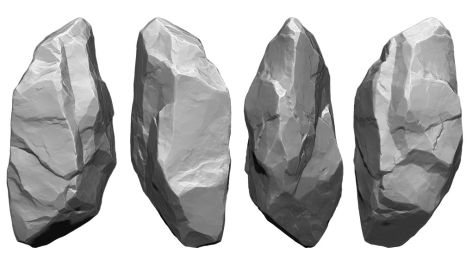
High poly model of the main rock.
Previously, if a rock I was sculpting didn’t look believable, I would start chipping and trimming the entire surface hoping this would help it look like a rock. Sometimes I would merely get mediocre results, but more often than not I would get lost in details and make the situation worse.
Learn from my mistakes and remember: surface details are never a problem.
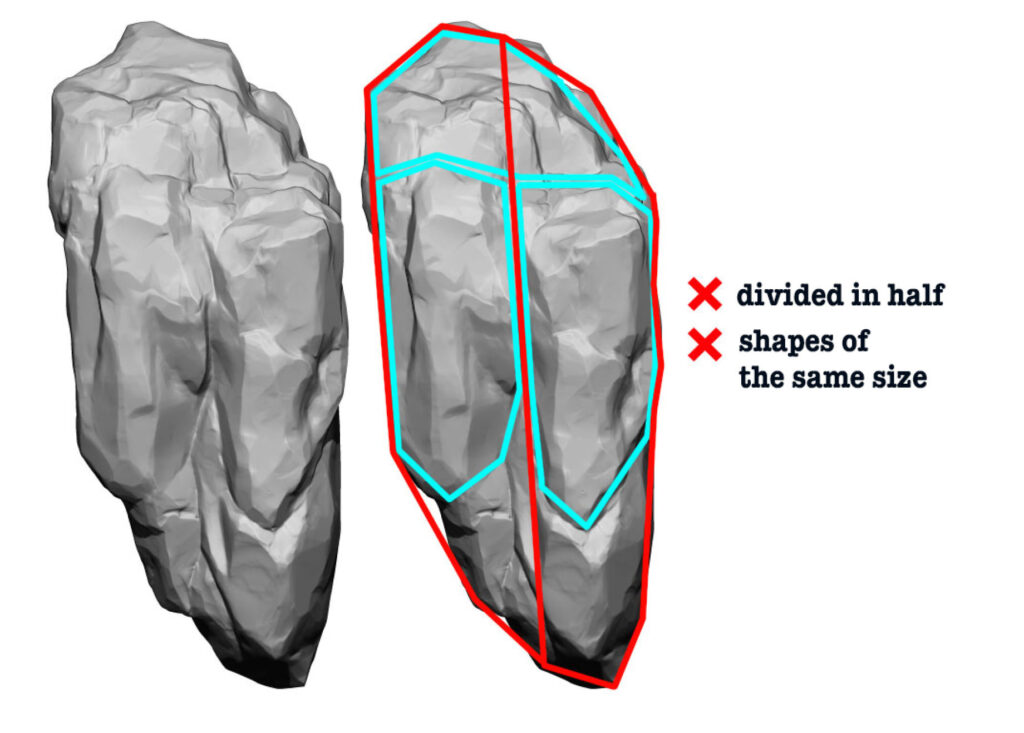
Build your primary, secondary and tertiary shapes. Put simply, make sure you have large, easy to read shapes as well as smaller ones. If your rock is composed of the shapes of the same size, it’s going to look boring and unnatural (like one of my previous attempts on the picture below).
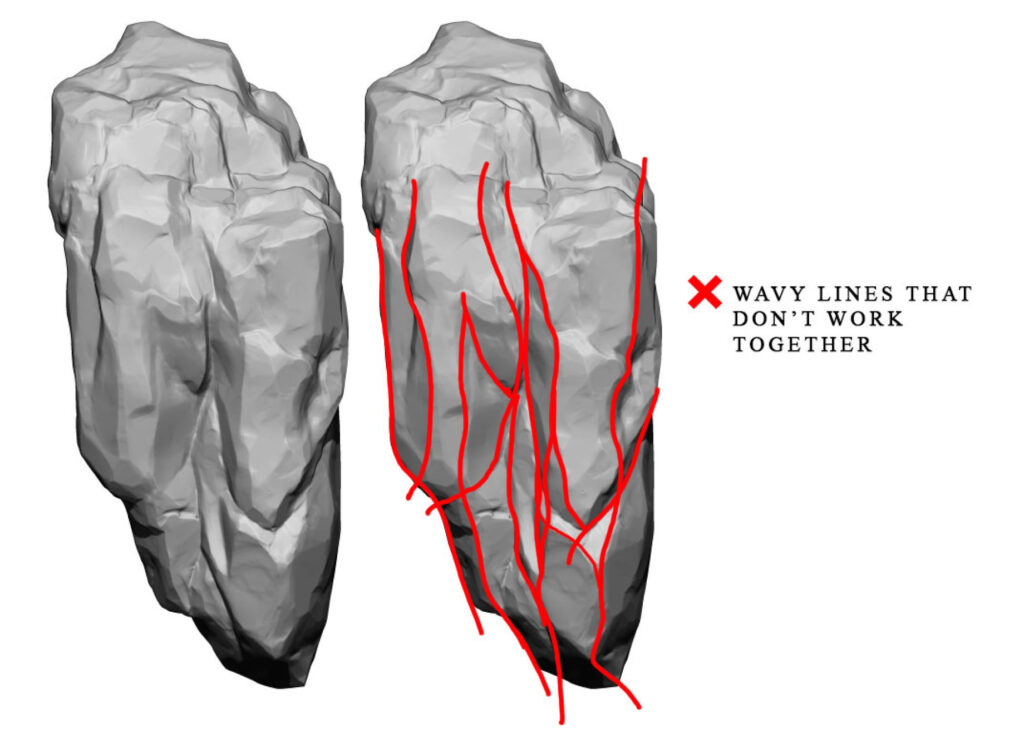
Flow is also important. Make the shapes of your rock support each other, have some directionality. Make them follow invisible guidelines if you will. If the shapes of your rock are all rotated at random angles, you would have a hard time making it work.
Even with all that in mind, building the main shapes could be very challenging. To learn how to do this, I bought a few rocks from Megascans, made screenshots from different angles and tried to replicate them, get similar shapes ignoring surface details. I immediately noticed my workflow changing.
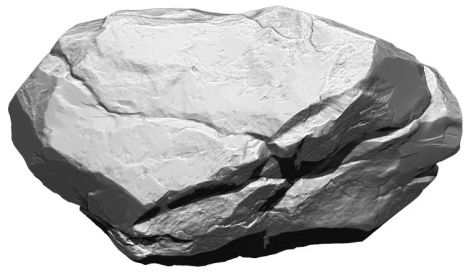
A model I made after practicing with scanned rocks (not in the project)
Using surface alphas helps a lot. You can totally work without them of course, but they can really speed up your process. They look very natural and instantly add a certain level of complexity to surfaces.
I would only say don’t rely on them too heavily and keep the main shapes and composition in mind.
A few helpful links for crafting rocks:
- Here you can find a great alpha pack by Dannie Carlone
- Stylized Rock Brushes by Jonas Ronnegard
- Rocks from Megascans come with surface alphas
- And a great video lesson by Erik Jakobsen.
I used a pretty standard set of brushes here: Clay Tubes, Trim Smooth Border, Trim Adaptive, Trim Dynamic, Orb Cracks, Planar Cut (with DragRect stroke type), Move and the alpha brushes I mentioned above.
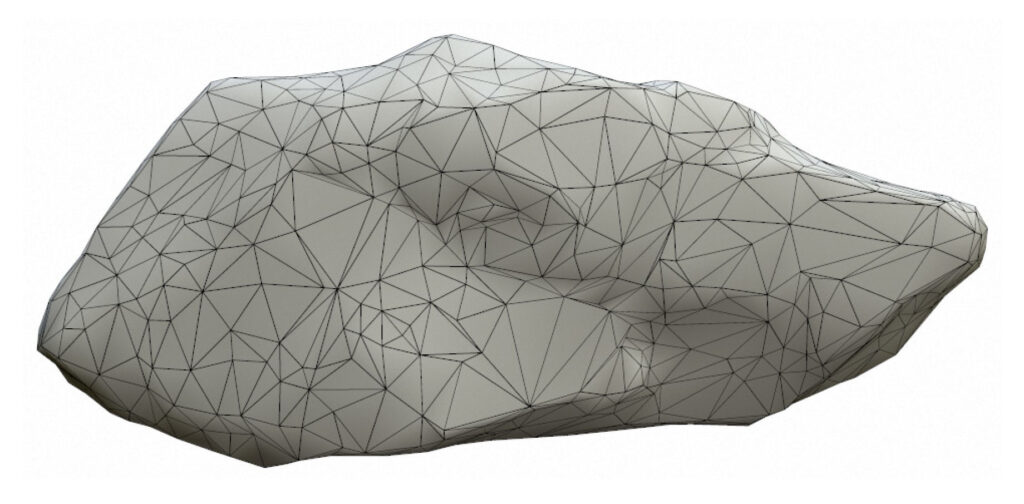
The low poly mesh is made by decimation in ZBrush and then unwrapped in Maya.
CIRCLE
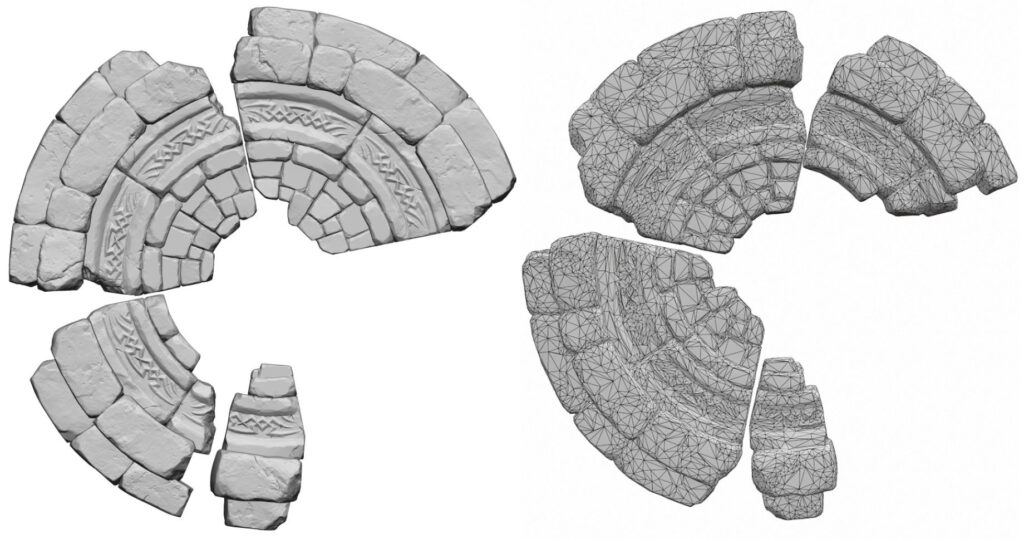
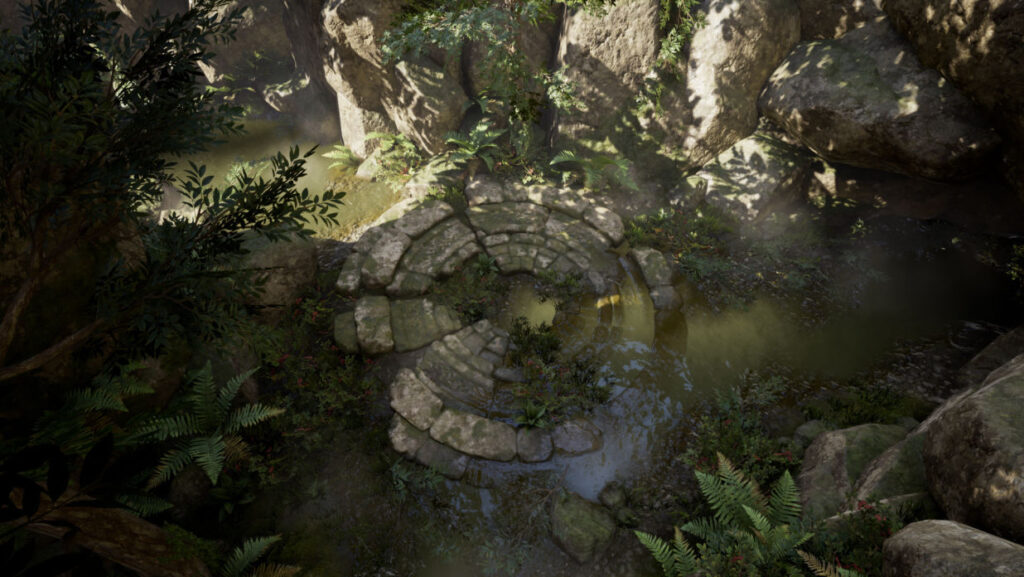
This model was not supposed to become a game ready asset. Just like the rock model, it’s a decimated high poly mesh unwrapped in Maya. I wanted it to look as pretty as possible because it supposed to be positioned right in front of the camera in the scene.
I started this with a simple sketch, built a rough mesh in Maya from the cylinder, separated the bricks so they could be converted to subtools, sent 1/4 of the circle to ZBrush and gave it a rocky look by trimming the edges, adding damage and applying surface alphas.
VEGETATION
All the vegetation in the project was sculpted and painted in ZBrush. I added an extra level of detail for a couple of plants in Substance Designerlater (see the breakdown in Substance Designer section below).
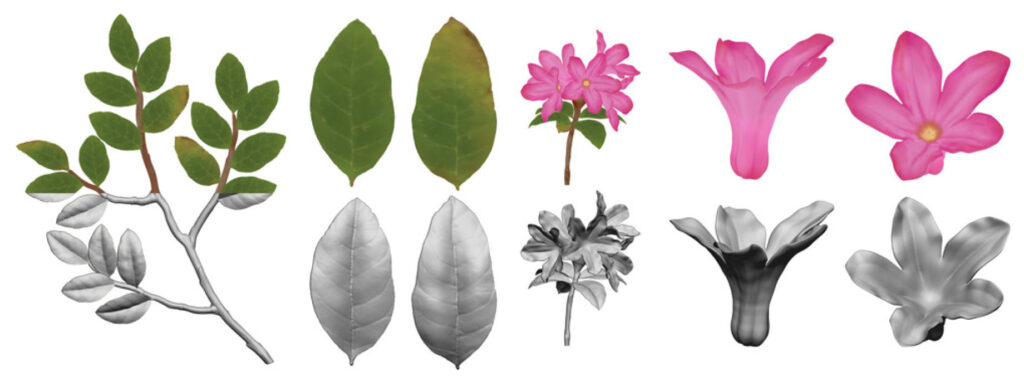
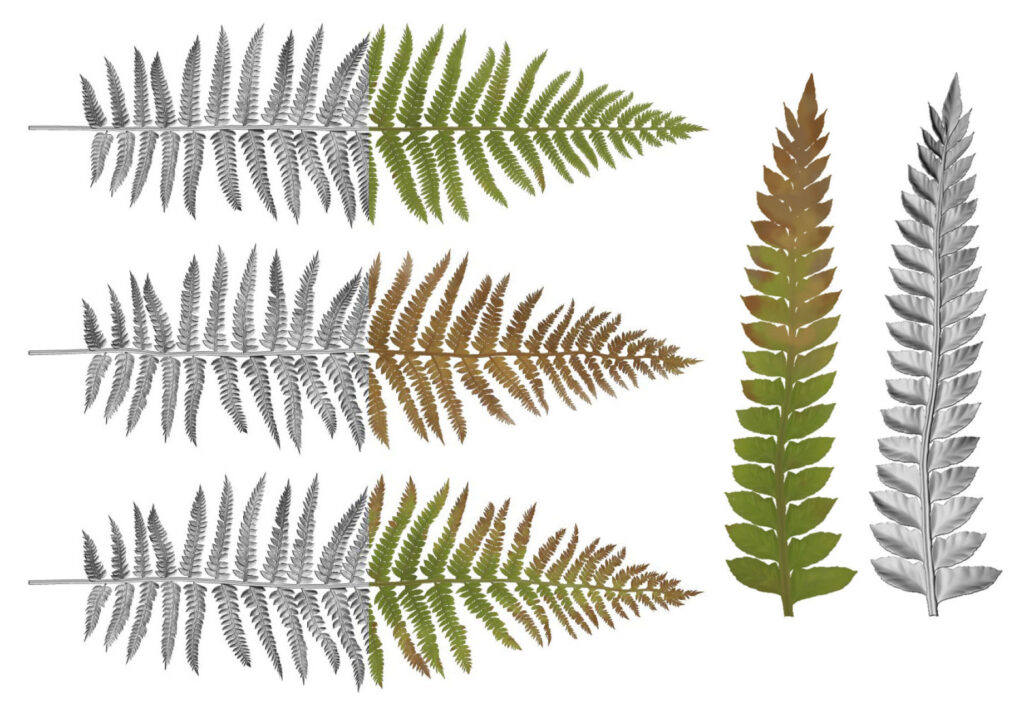
I used a few brushes you already know and love – Move, Standard, Dam Standard, Trim Dynamic, Orb Cracks, Pinch and a couple of others.
For me, sculpting it all was the most fun. I’ve had a few challenges of course, as these Ivy leaves, for example.
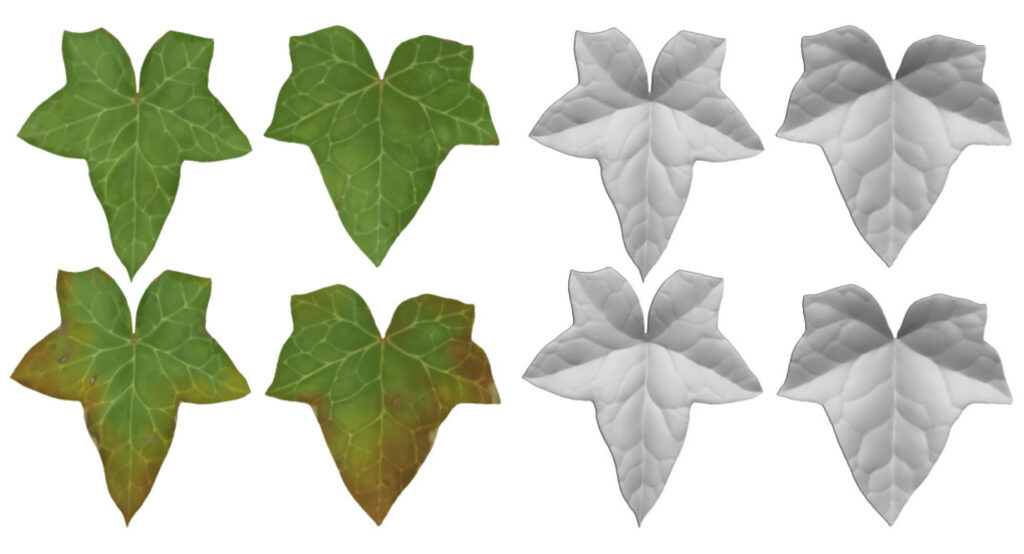
I just couldn’t get them right at first, they looked unnatural somehow. Then I took a pen and a piece of paper and drew a couple of leaves. I immediately realized what the problem was – I forgot to think about them in terms of simple shapes – bent lines, S-shaped lines, and points. Once I figured that out, I was able to get the silhouette right in no time.
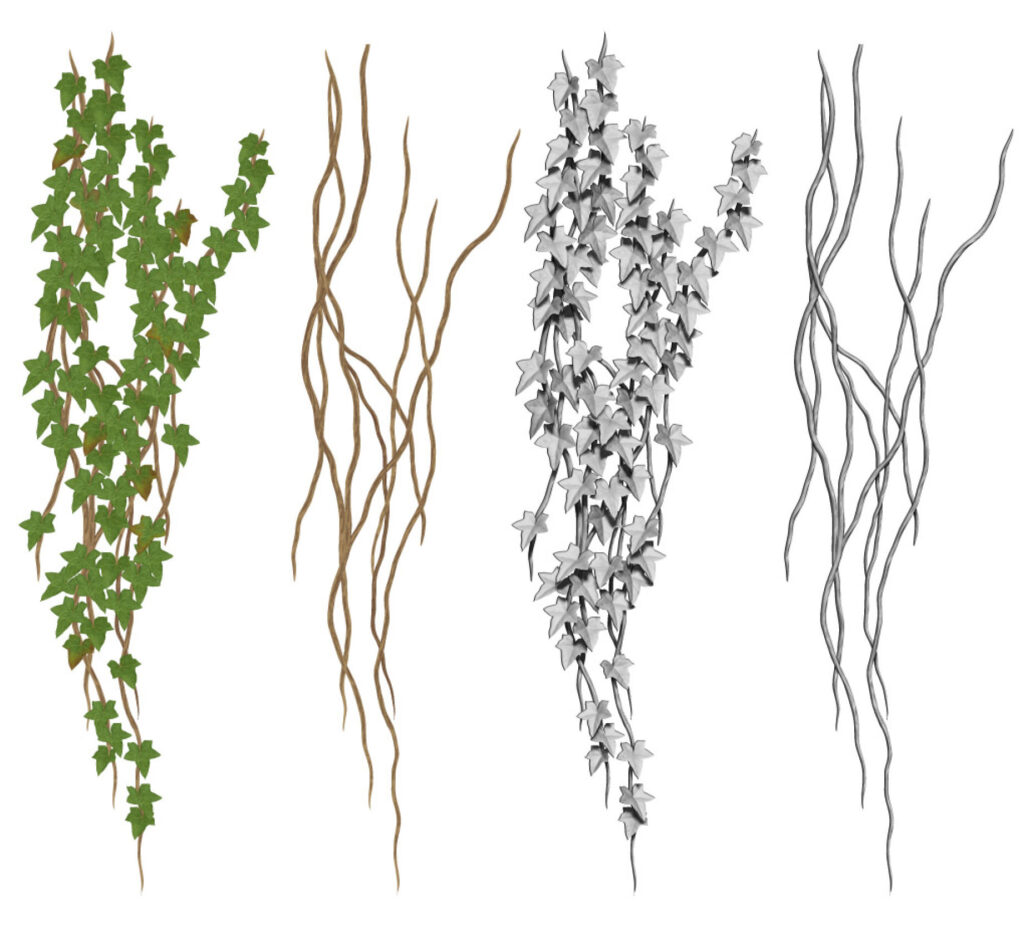
For the polypaint stage, I imported albedo maps from Megascans in ZBrush and assigned them to a plane which I then used to pick colors from. As you can see on the picture above, Ivy looks pretty flat after the polypaint stage because the same leaves were scattered everywhere along the vines. We are going to look at the ways to fix that in a bit.
TREE CANOPY
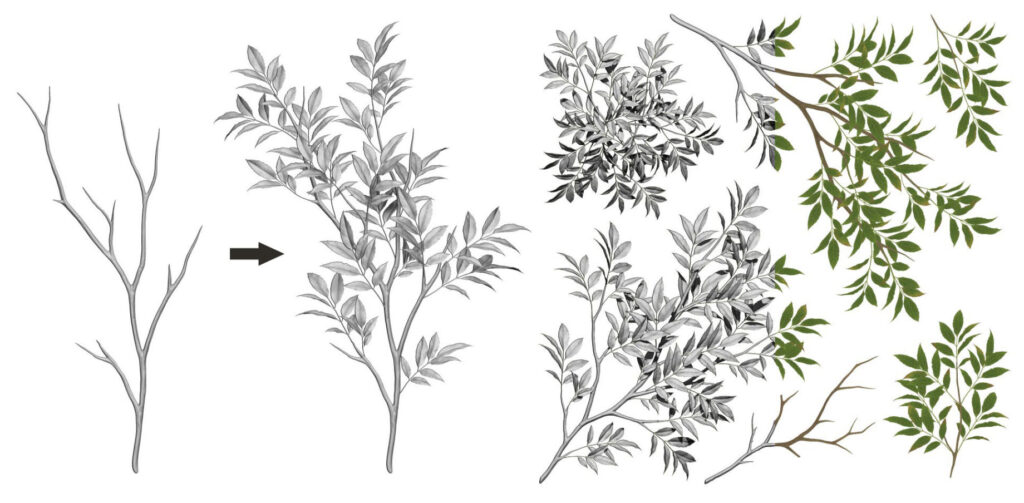
I started the canopy with sculpting and painting a single leaf and making a few variations from it. I then made a couple of small branches with 7 leaves each.
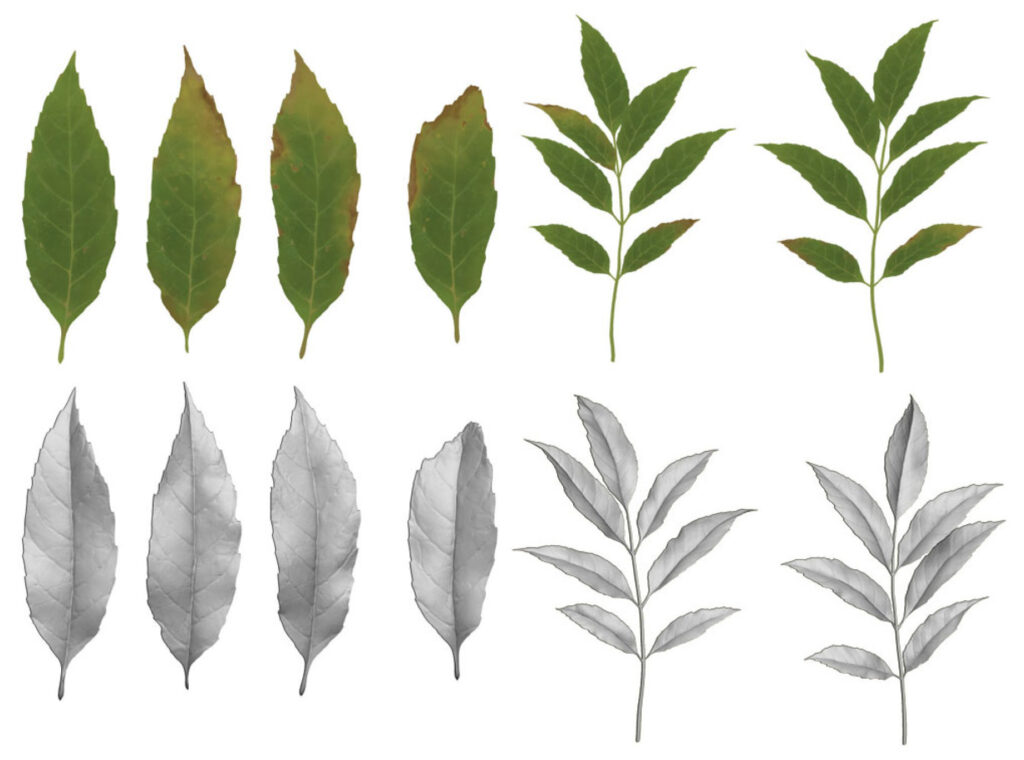
After that, I made bigger branches and populated them with the smaller ones. I made 6 different branches that later became cards in Maya.
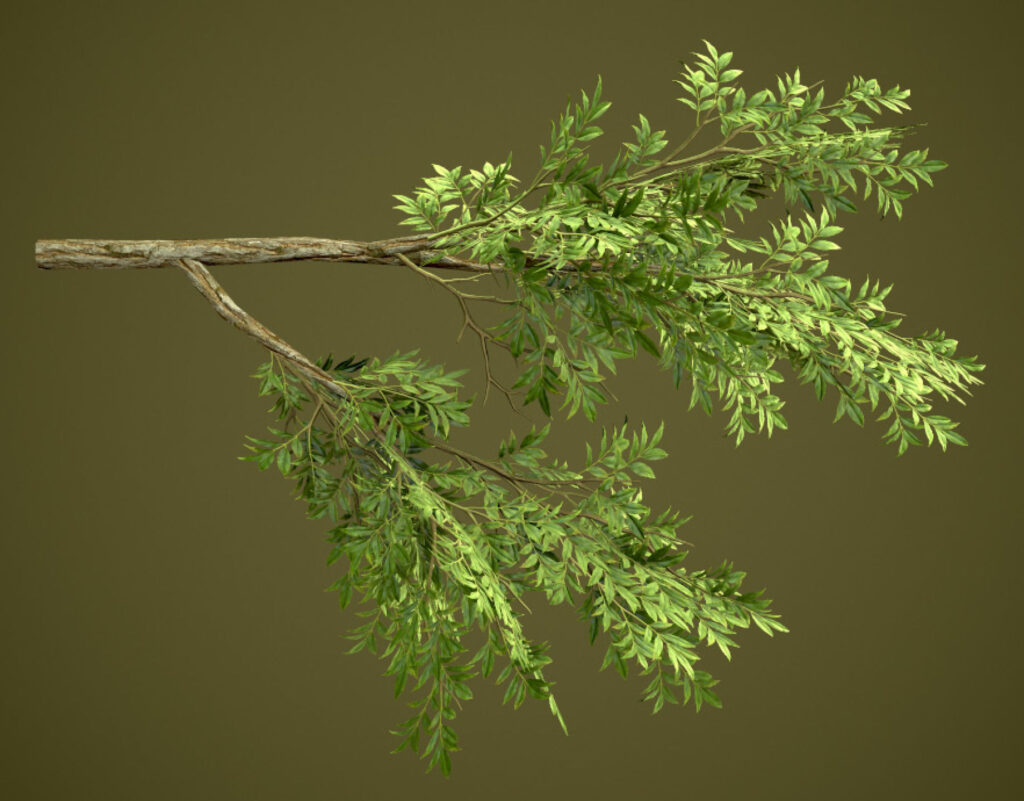
I used the same approach with the low poly meshes. First I made the cards, then branches, populated them with the cards and finally populated the trunk with the branches.
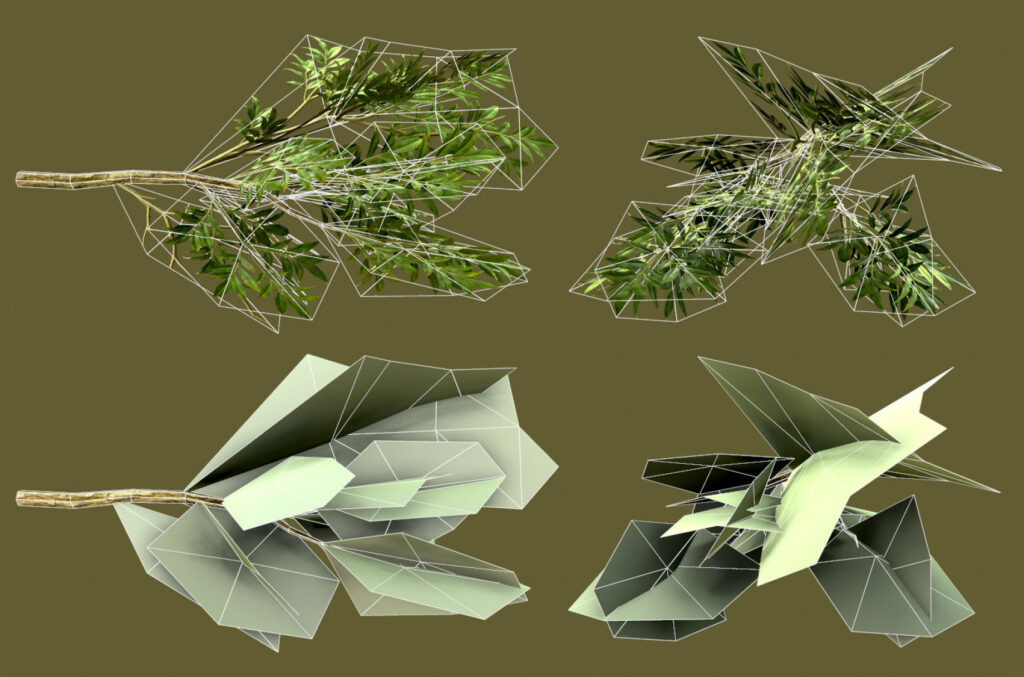
It was I bit challenging to make branches in Maya from scratch, so I made a couple of sketches of them and a trunk in Photoshop (just branching patterns, really simple), imported them in Maya and worked on them with comfort.
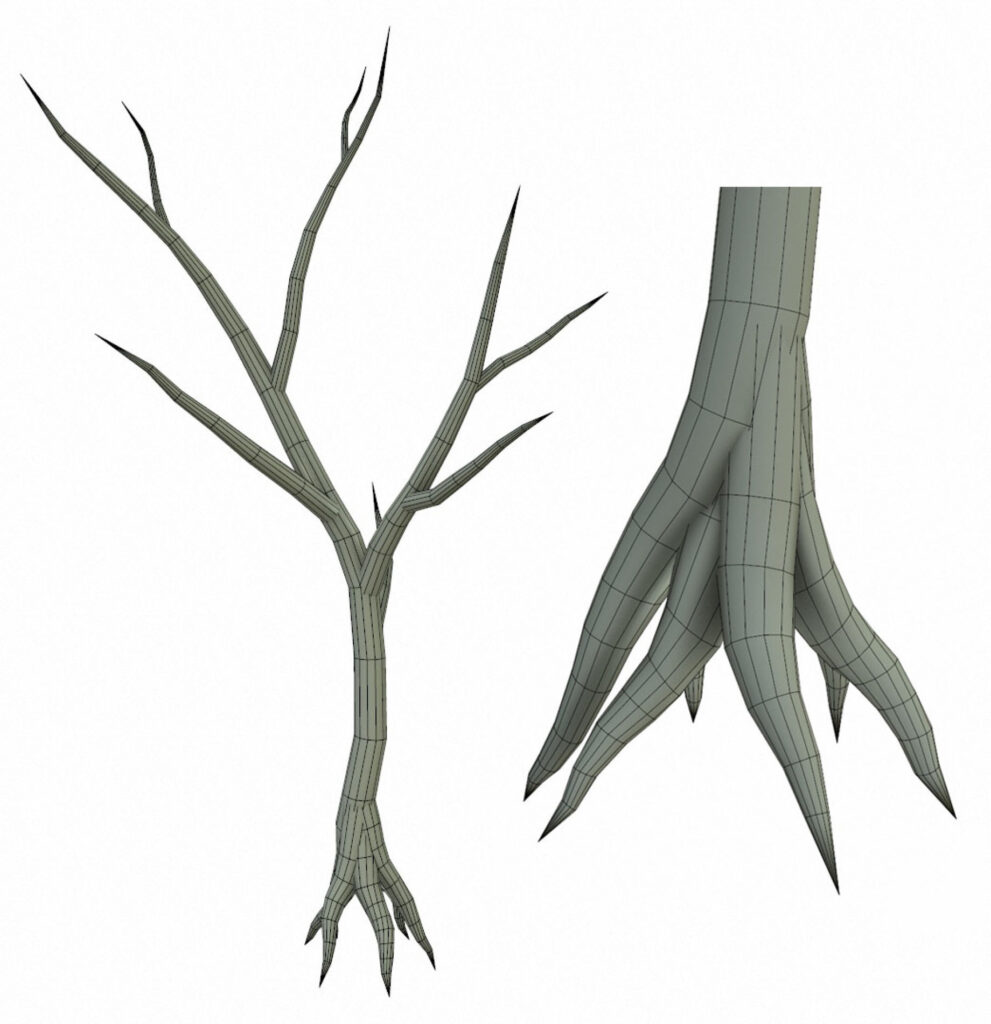
Finally, populating a trunk was no different from the previous steps. I ended up having 7 different branches. I started placing the largest of them at first to get an idea of the silhouette and continued with the others.
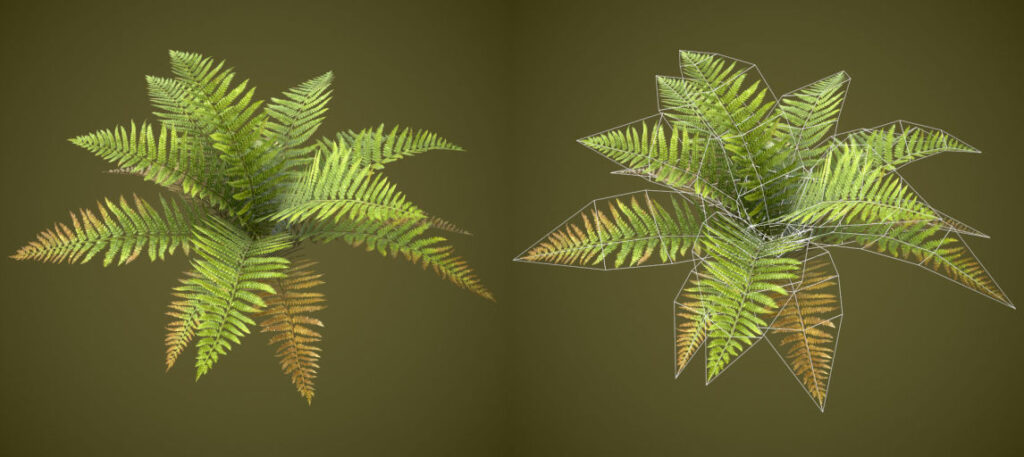
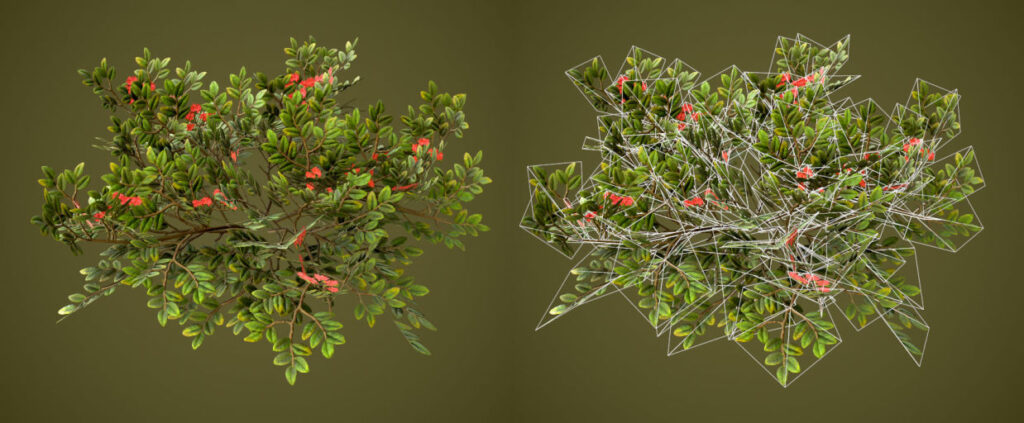
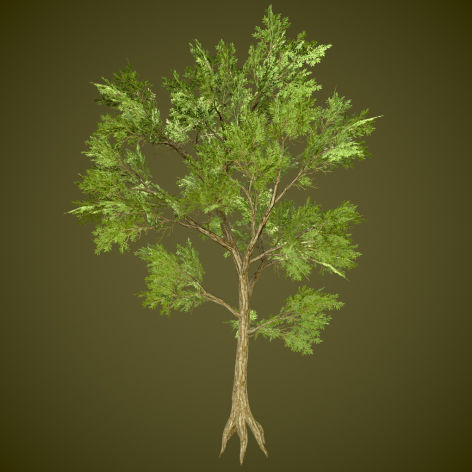
The final poly count of the tree is 11150 triangles.
Substance Designer
IVY DETAILING
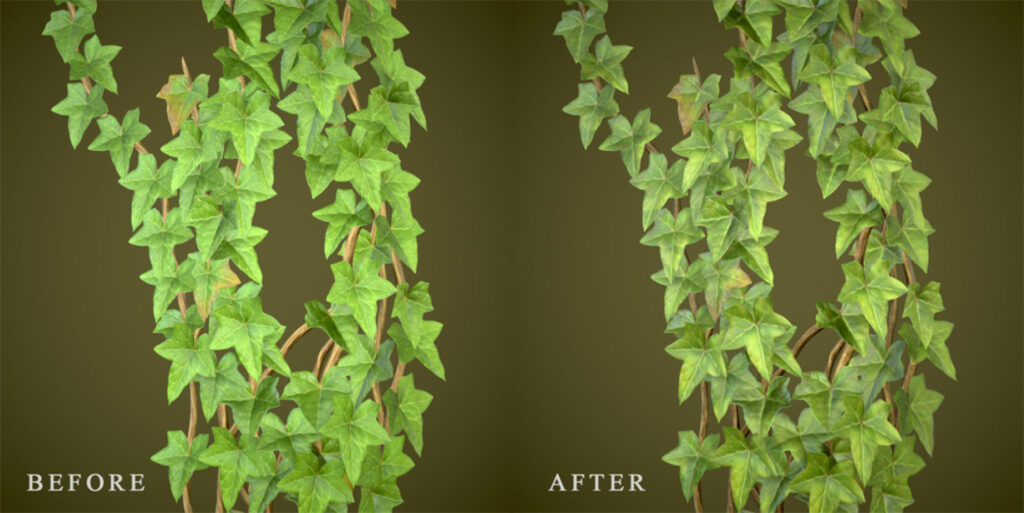
At this stage, I tried to mask the repetitiveness of the albedo map, make each individual leaf look a bit different from the others, get crisper details, color variation and contrast.
Here I’m trying to get brightness variation by applying color to a Perlin noise:
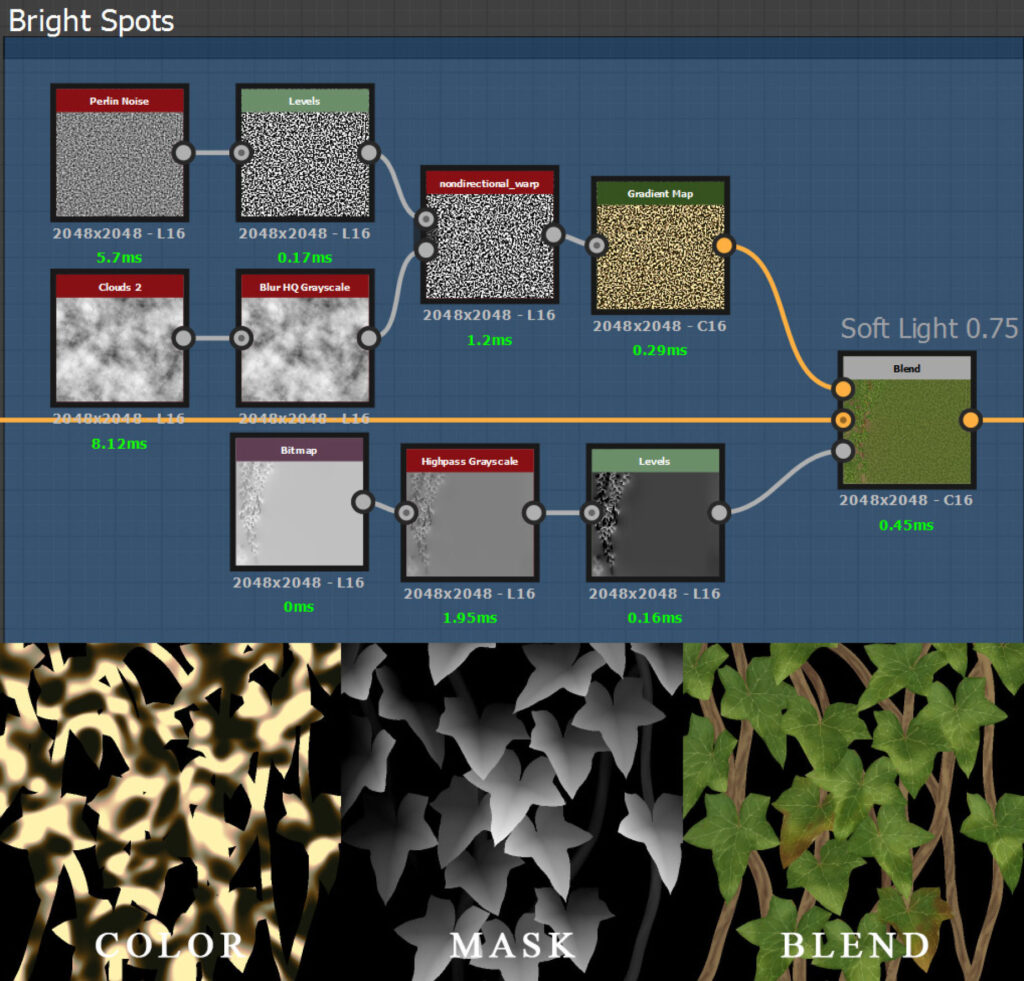
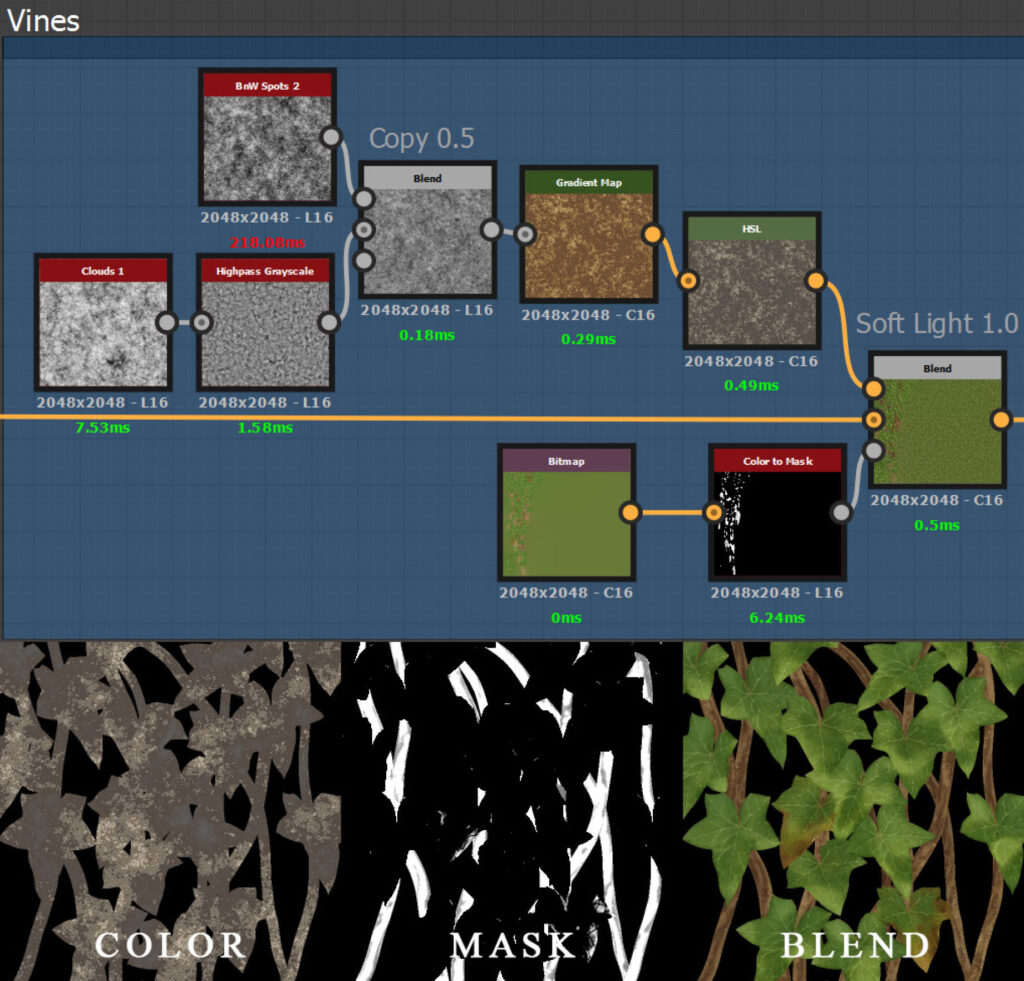
Adding contrast to the vines. I’m using Color to Mask from Albedo map to isolate the vines. I could’ve made a color mask in ZBrush of course, but this way works as well.
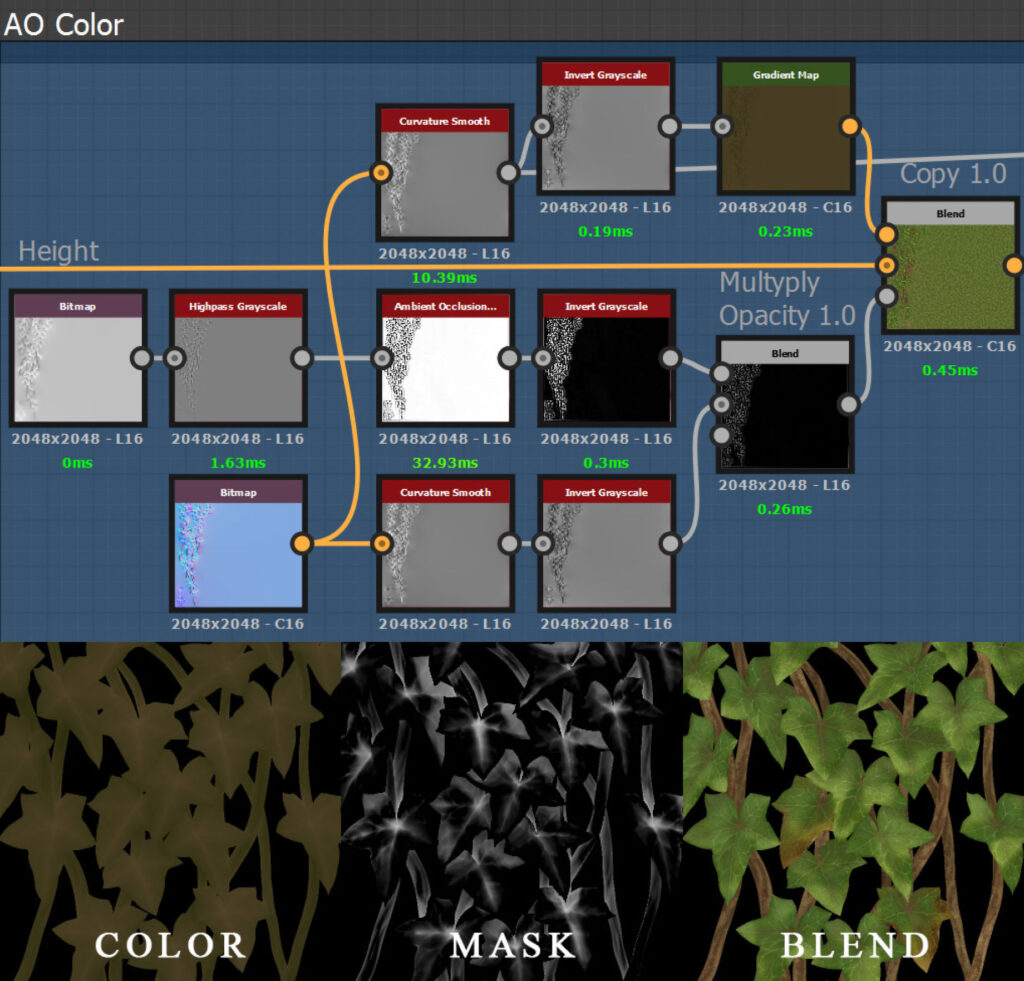
You shouldn’t bake AO information to your albedo maps, but this is not what I’m doing here. I’m applying a color that I can clearly see on the reference. I’m going to reduce the AO effect a little with the next step.
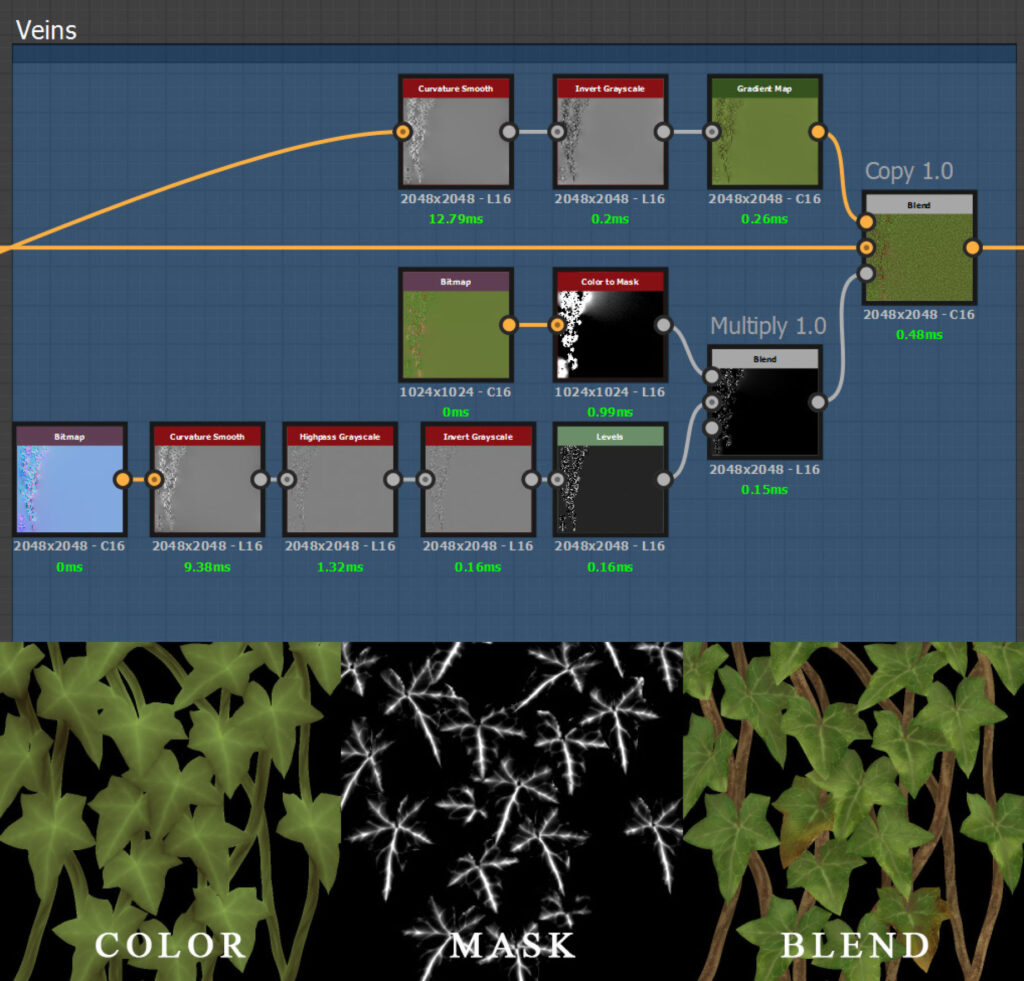
I’m emphasizing the veins here because they came out very thin. I’m making a mask from Curvature Smooth and subtracting the vines from it so that only the leaves get affected. It also helps to reduce AO effects from the previous step.
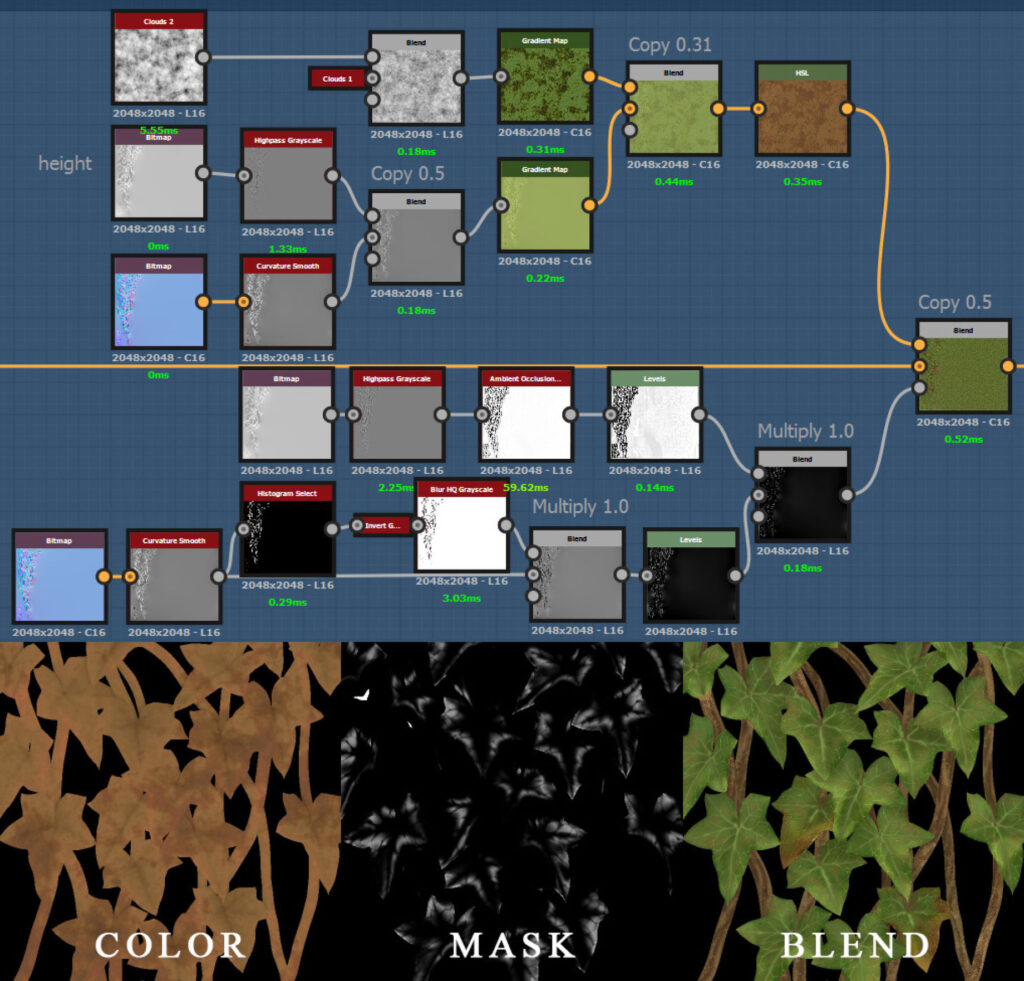
And finally, I’m adding some reddish color to get more variation. I’m pretty sure I didn’t need so many nodes for the color because the overall effect is very subtle. The most important node in the mask chain is Curvature Smooth. Other nodes are multiplied on top, subtracting different elements. Vines and edges of the leaves are subtracted with the help of Histogram Select, and AO is removed by the corresponding node. Everything in the middle is left on the mask.
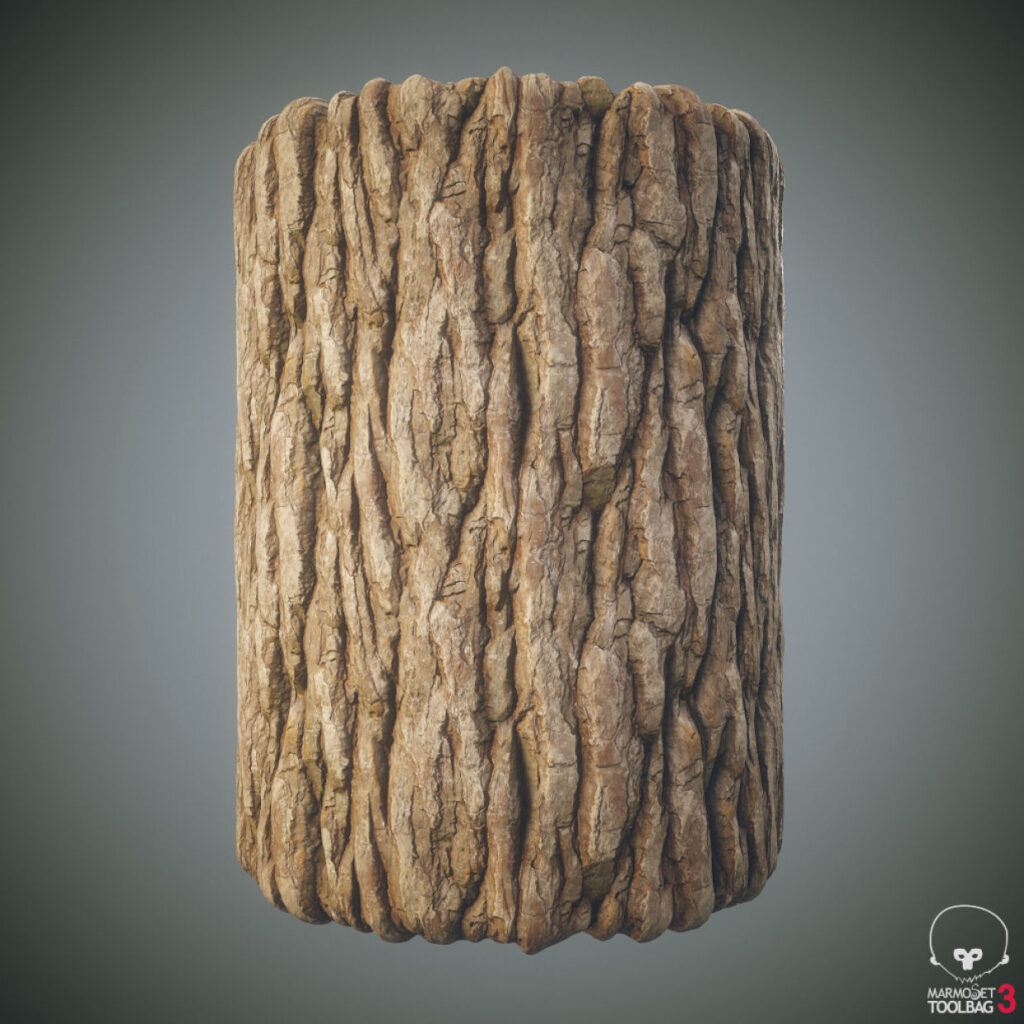
BARK MATERIAL
The technique for it was learned from Wes McDermott. You can get his free bark material on Substance Share.
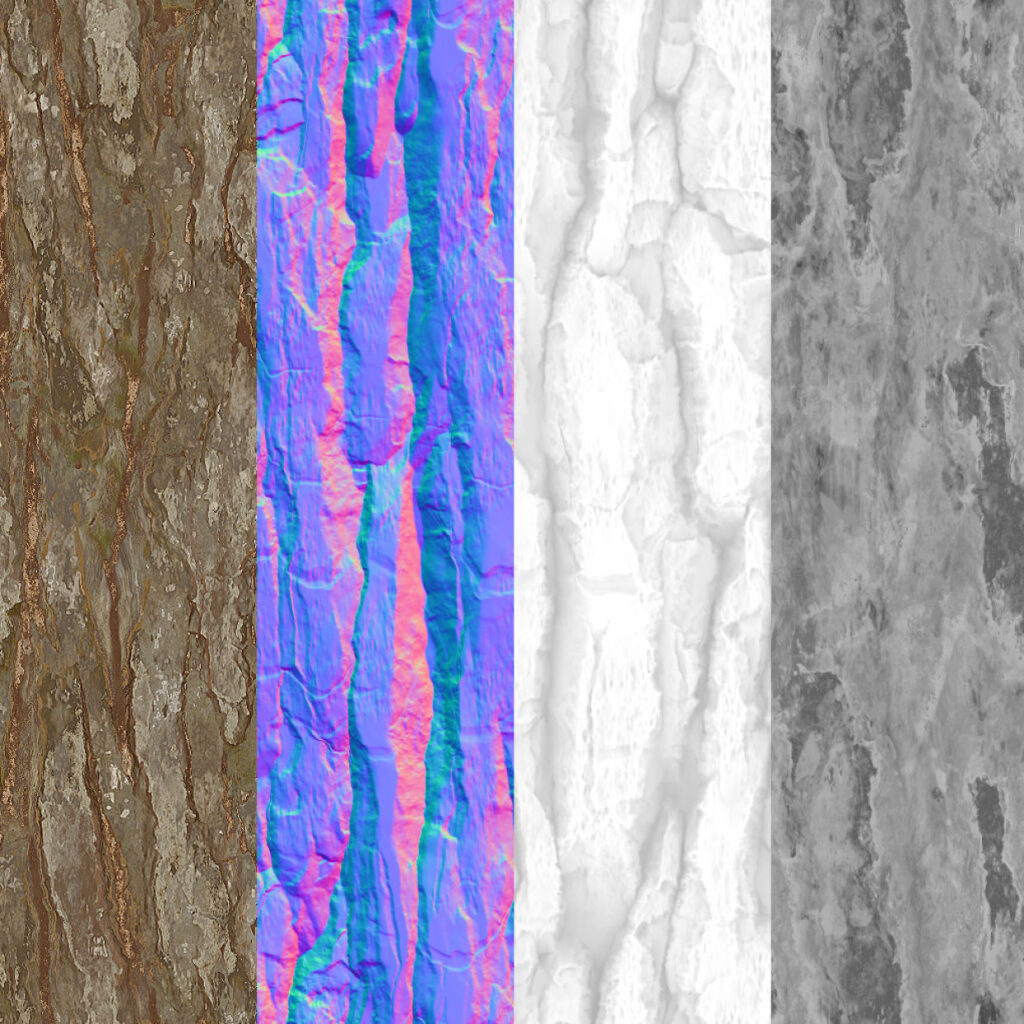
The FX-Map here randomly shifts the input image vertically and rotates it by 0 or 180 degrees every turn.
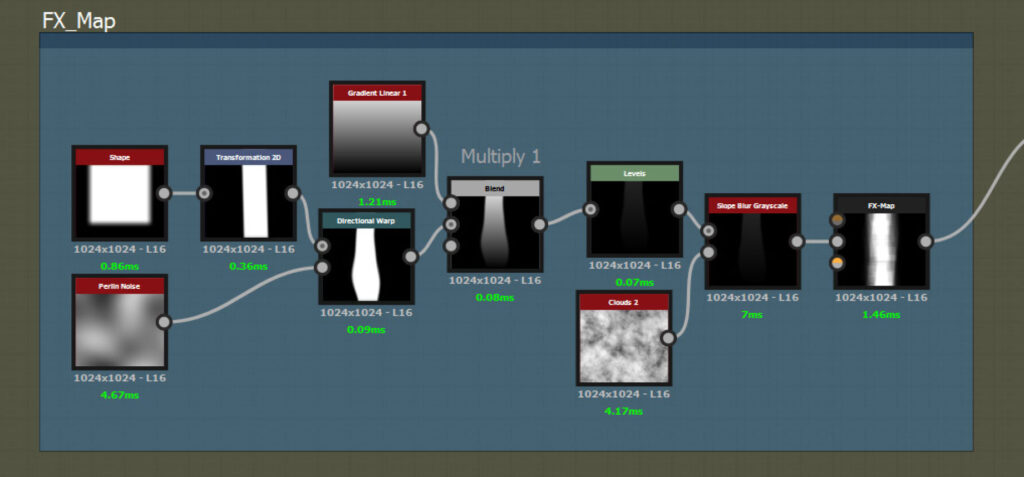
Applying more warping and building a base with a tile generator. Then increasing Pattern Size X or Y of Moisture Noise gives it a nice wood fiber effect.
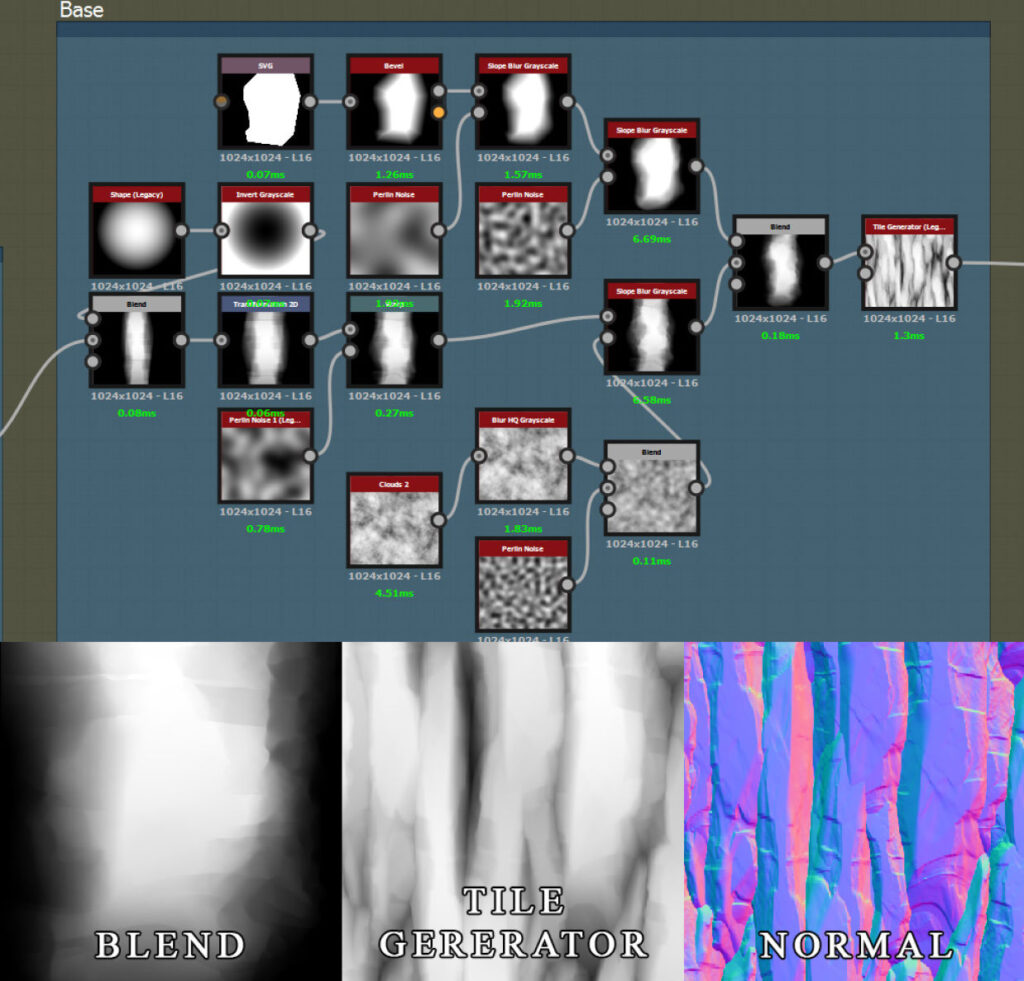
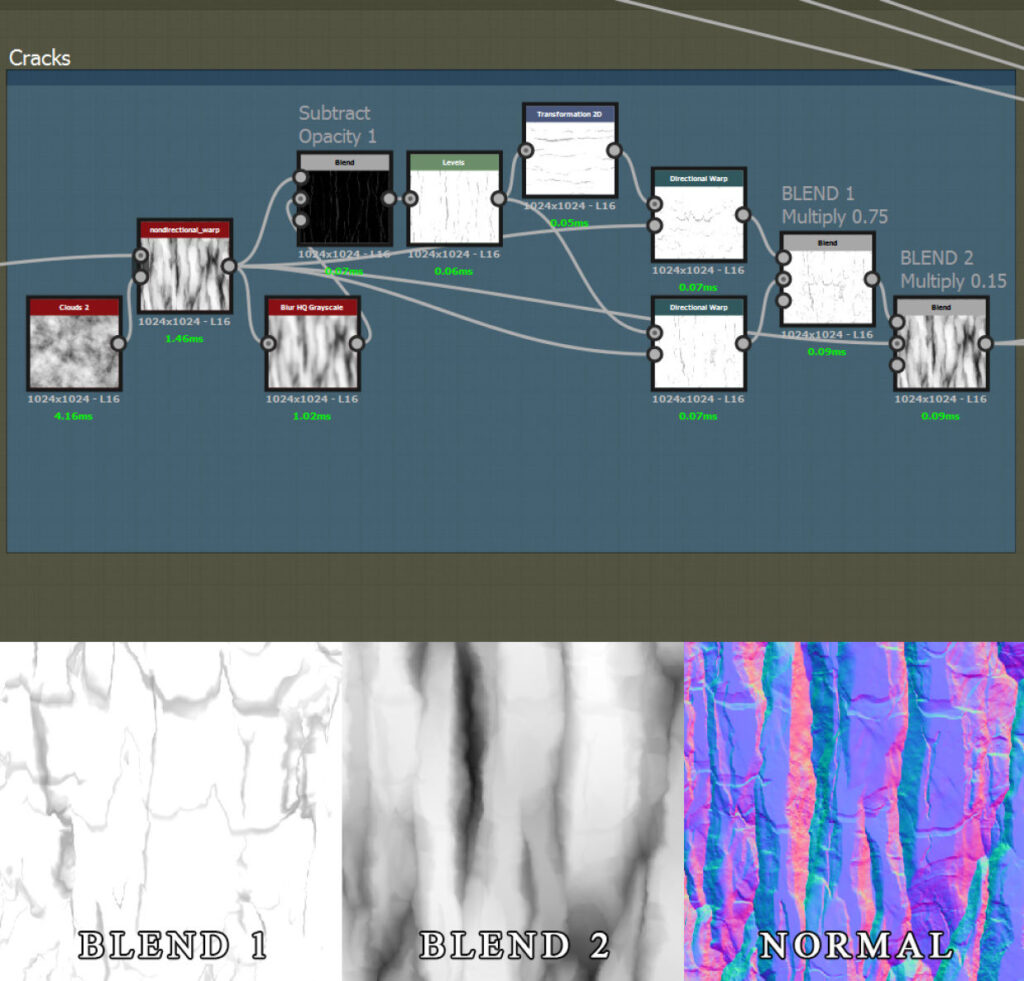
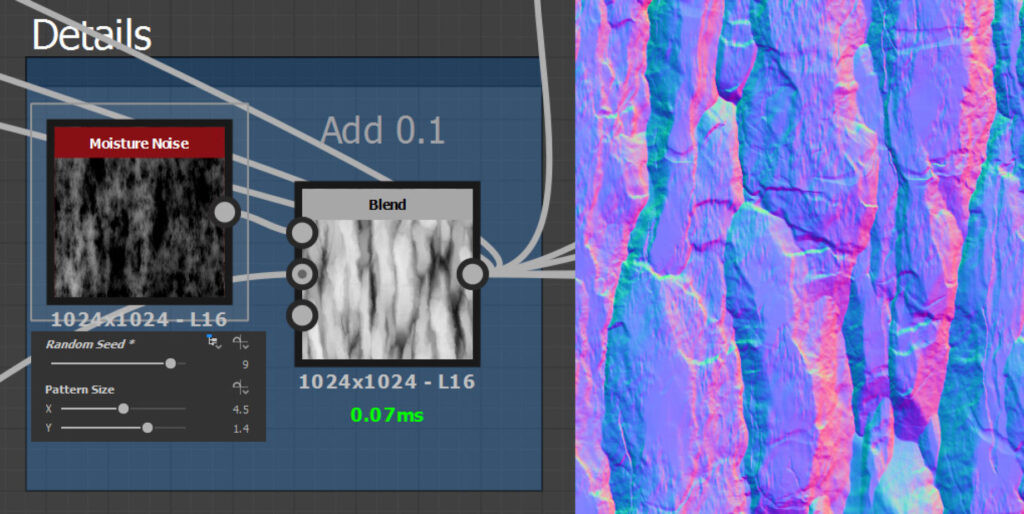
Having a good reference image is vital here. I used one of the bark albedo maps from Megascans.
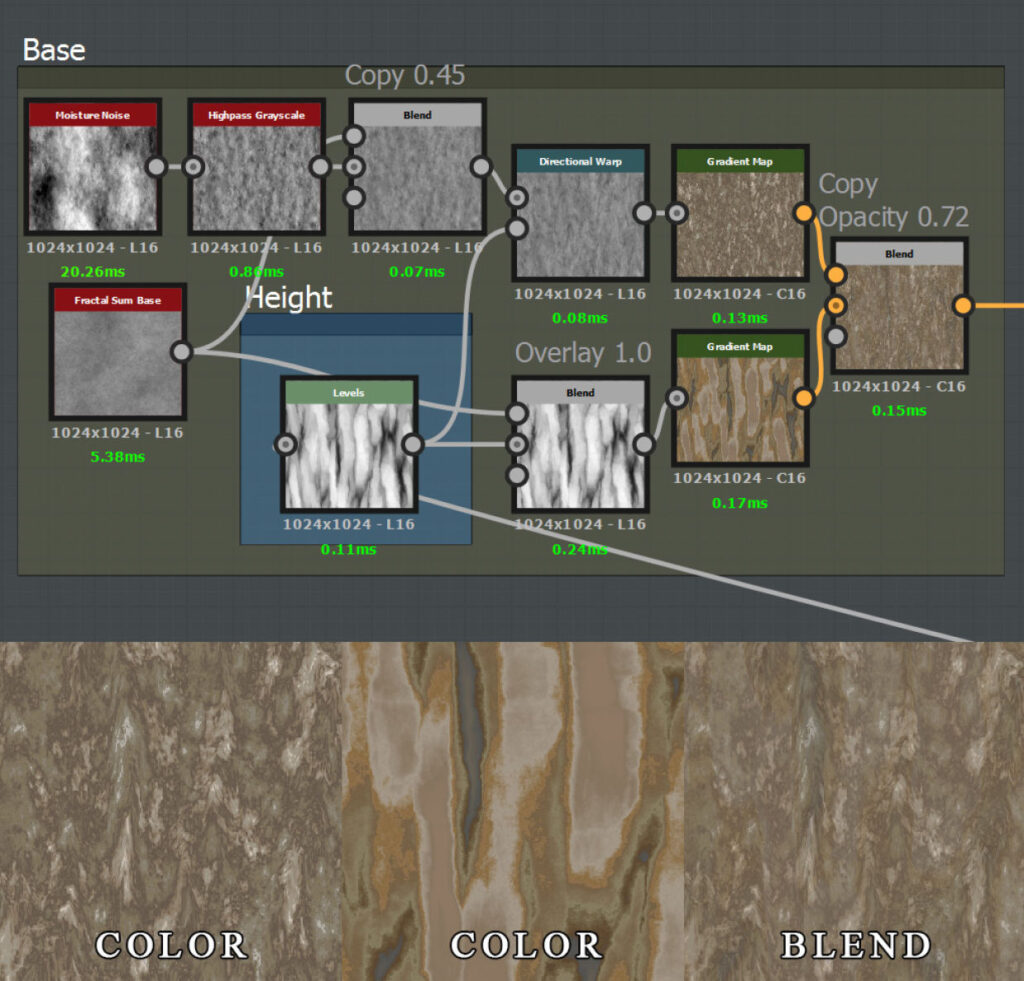
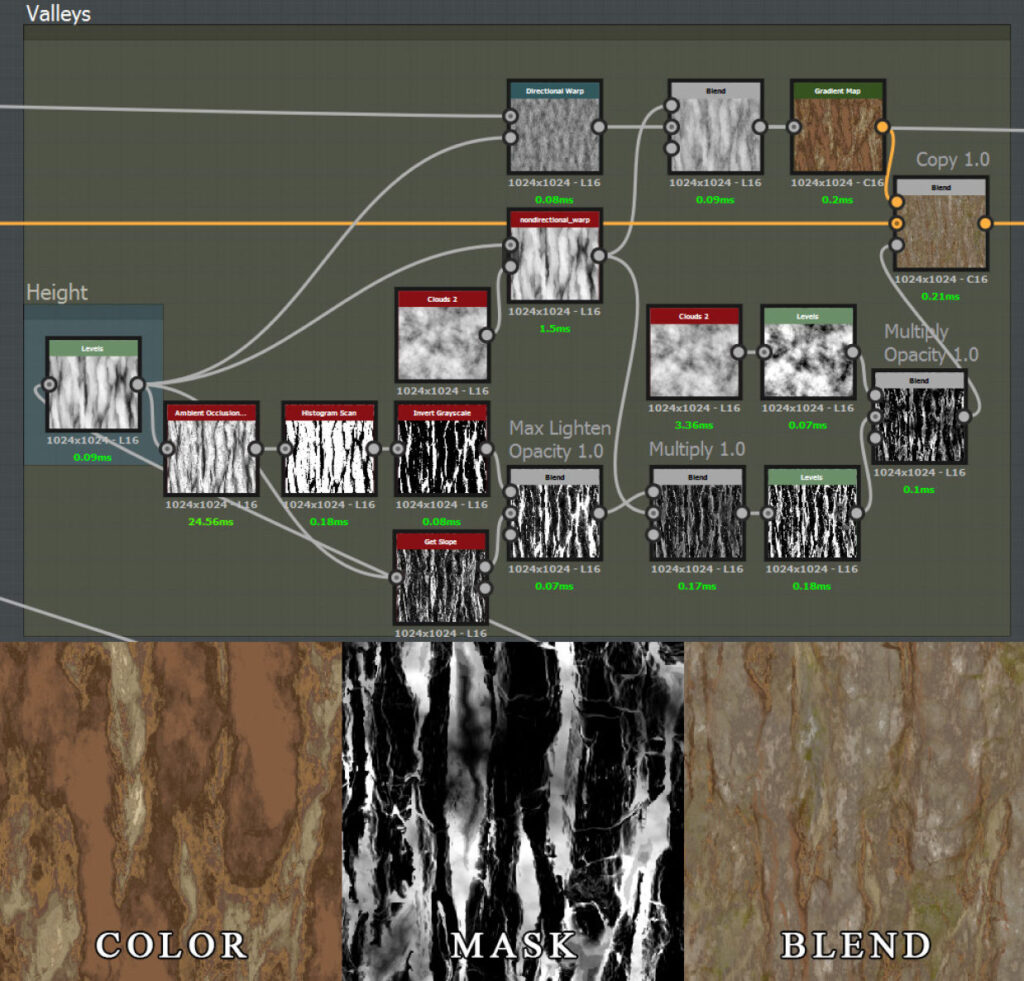
The algorithm here is simple – analyze your reference, decide which of the characteristics you are going to implement (edges, slopes, cavities, random spots, moss etc.), think of the ways you can build masks for them and “paint” them in separate layers.
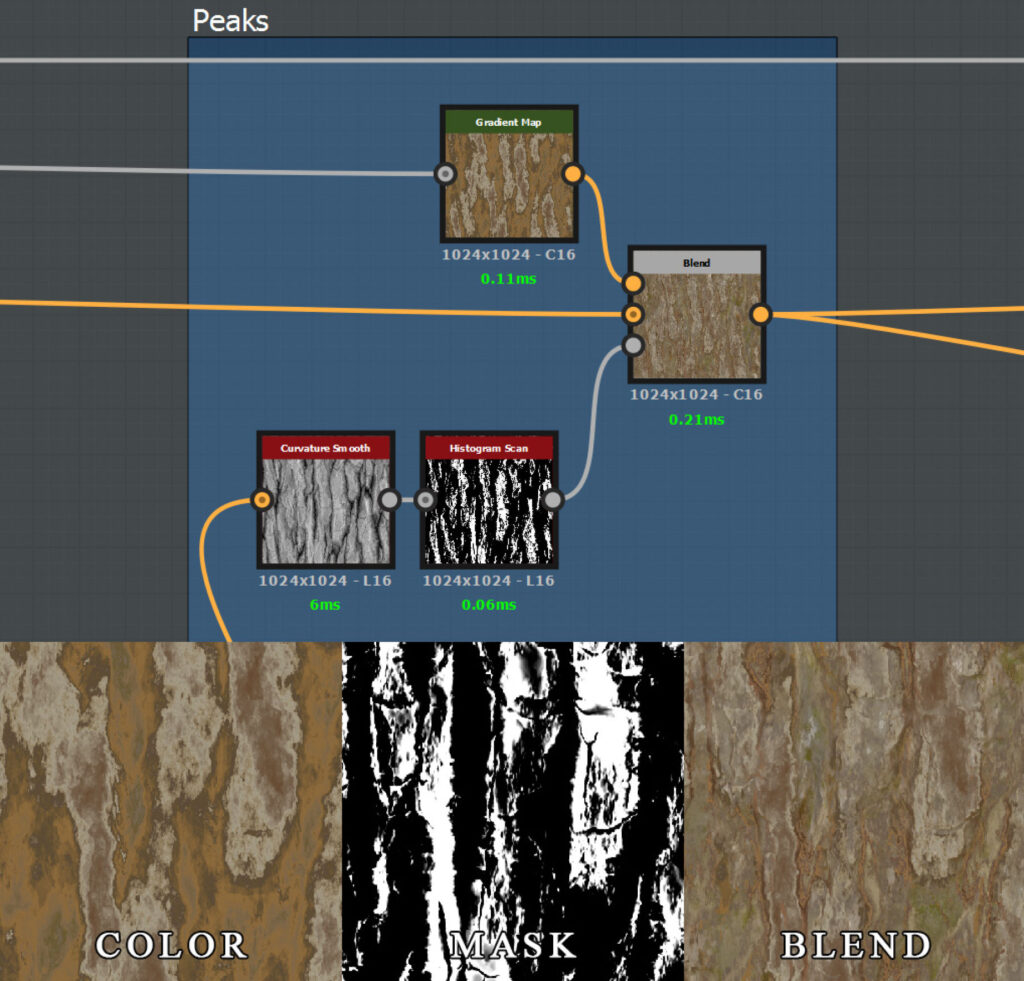
Don’t try to get all of your colors in a single Gradient Map, always do it layer by layer with new gradient maps and noises.

Here I’m trying to get thicker slopes. After blending Get Slope with inverted AO, I multiplied the height map on top and this gave a certain depth to the mask, shifting the focus from AO to the slopes. I multiplied Clouds 2 on top to get some variation, otherwise, it would look uniform and unnatural.
Coloring the highest points:
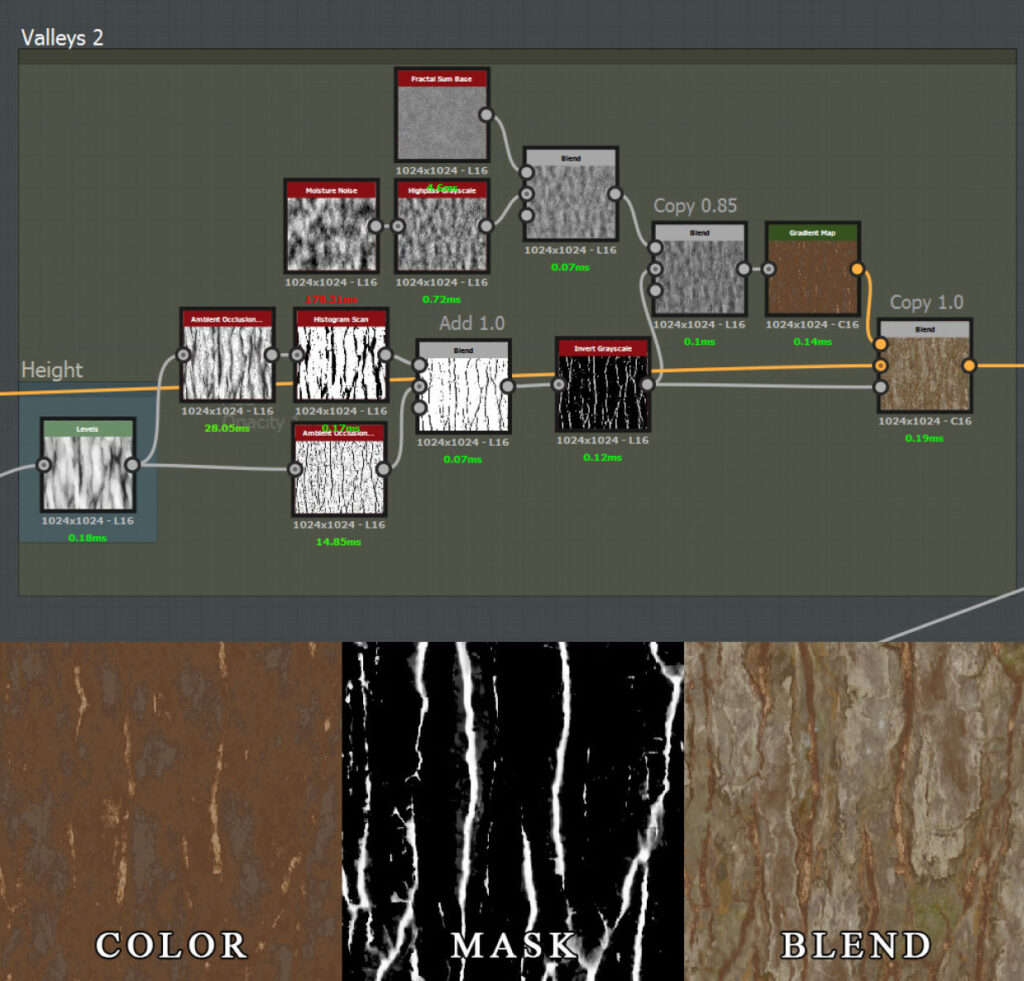
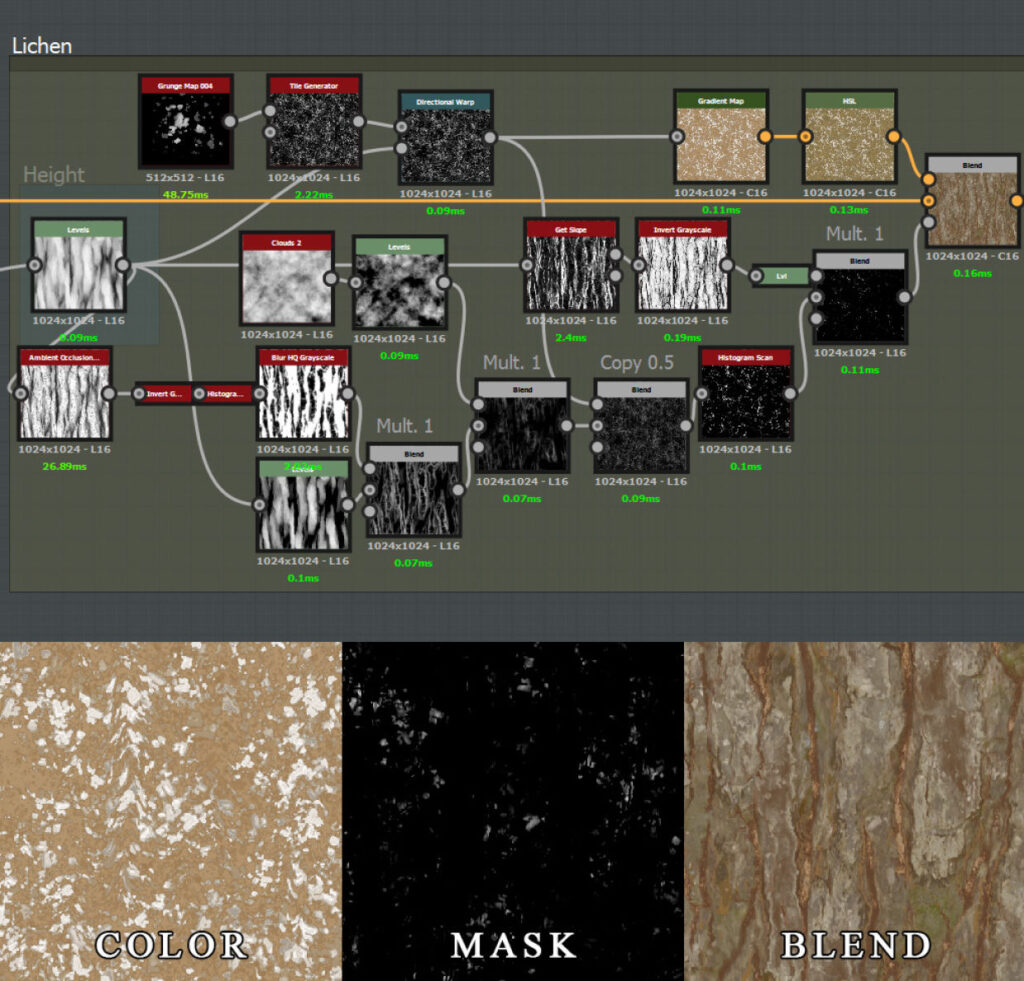
Another Valleys’ pass. This time I’m addressing the lowest points because they are very prominent in the reference image. After that I tried to make lichen look like it belongs to the surface, that’s why it’s masked so heavily by clouds and slopes.
I made 3 more tiling materials for the project – rock, grass and rocky ground.

I learned a lot from great Substance Designer artists who share their work on Gumroad, Artstation and Substance Share. I highly recommend anybody who wants to get better at Substance Designer to take a look at their work – it will save you an enormous amount of time.
- Daniel Thiger
- Jonas Ronnegard: Vol 1 & Vol 2
- Christopher David Hodgson
- Josh Lynch
- Ben Wilson
There are also “signature” materials available on Substance Source and a ton of useful stuff on Substance Share.
Other Materials
ROCK
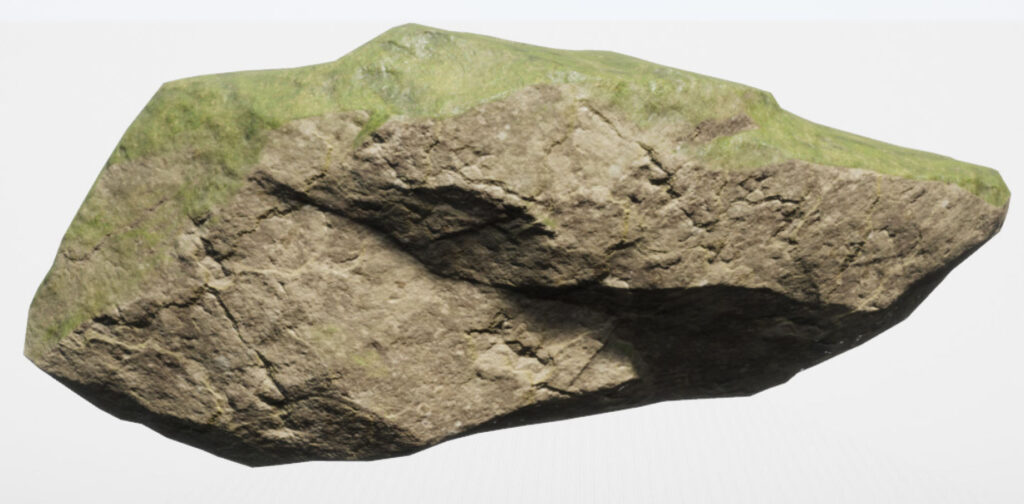
The materials are pretty simple here. The most “complicated” one is the rock material with the slope function, which makes the moss always grow on top.
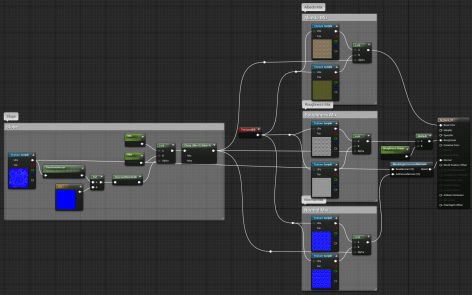
Rock material
Two materials (rock and grass) are tiled 5 times, masked by the slope, and blended with a normal map baked from the high poly model.
CIRCLE
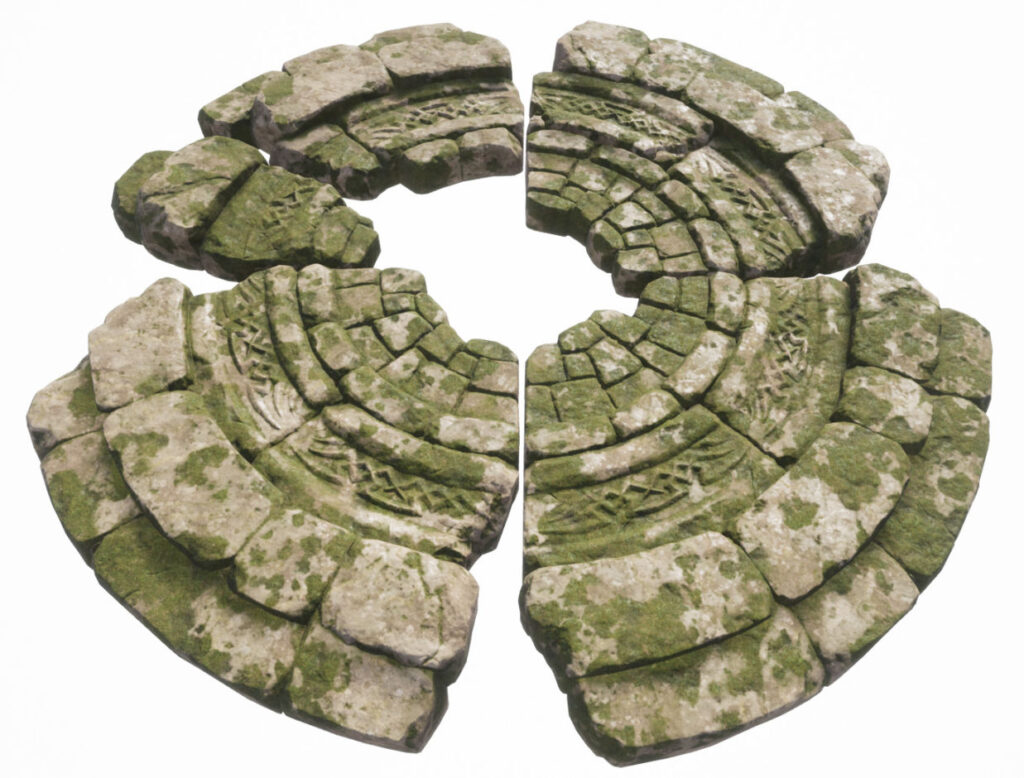
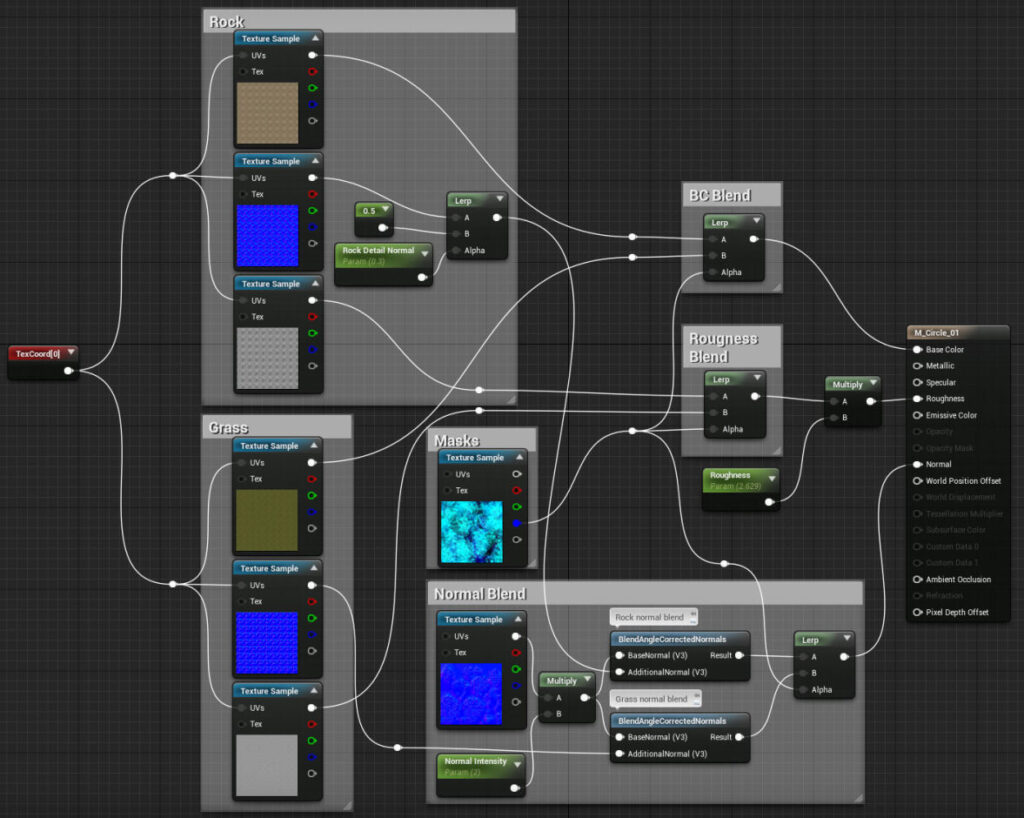
Rock and grass materials are tiled 9 times and blended by a mask I made in Designer (on the graph below). And of course tiling normal maps are blended with the baked one.
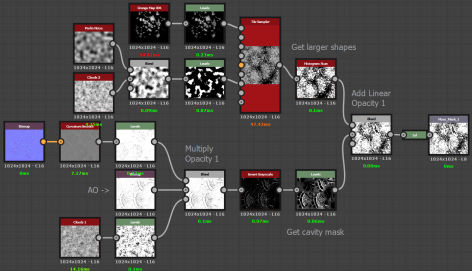
Circle mask graph
I’m using Grunge Map 4 and a tile sampler to get large random areas of moss covering the model. Then I blend it with cavity/AO mask.
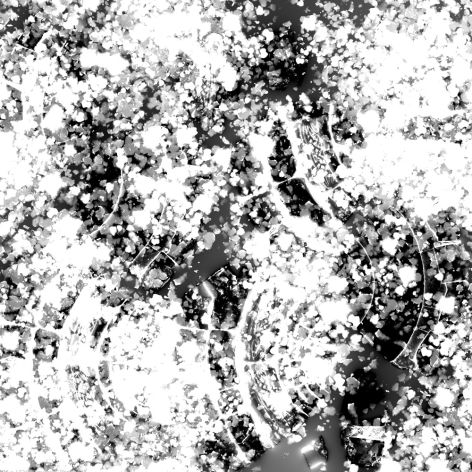
The resulting mask
TREE
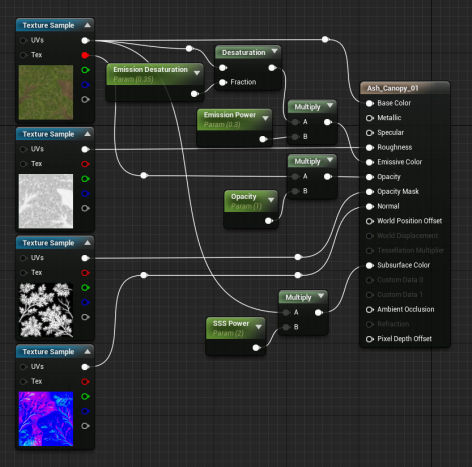
Tree canopy material
The materials for the rest of the plants look pretty much like this one – nothing too complicated. I use a fake emission trick here to light the canopy a little because it goes black when viewed from behind after baking the lighting.
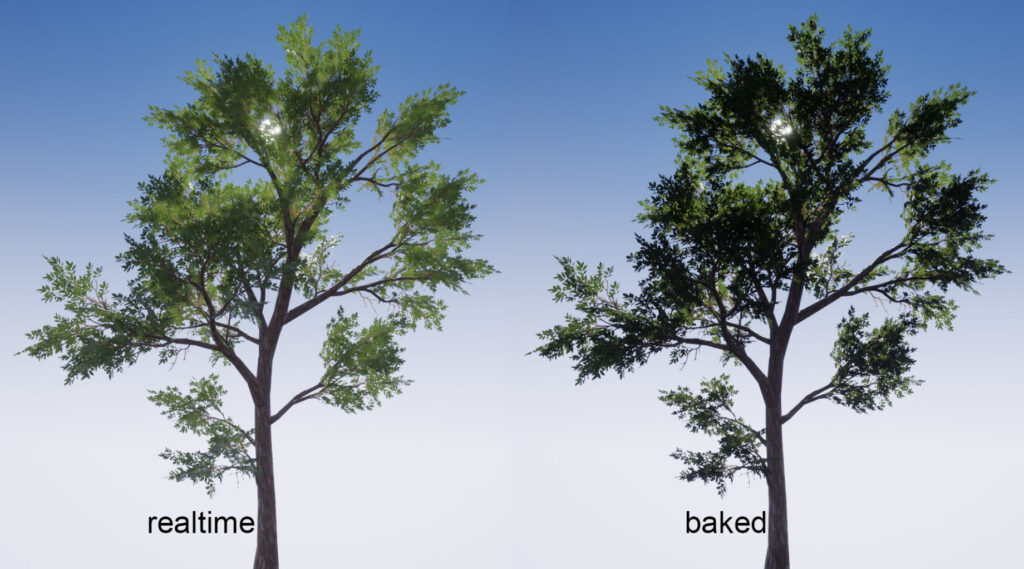
Lighting
I use a standard lighting setup in the scene: a single directional light, sky light, reflection probe, Post Process Volume, Exponential Height Fog, and Atmospheric Fog.
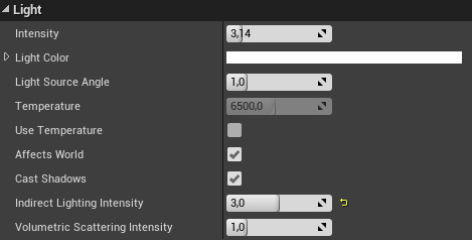
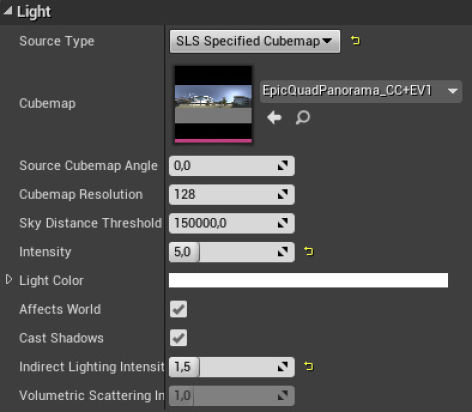
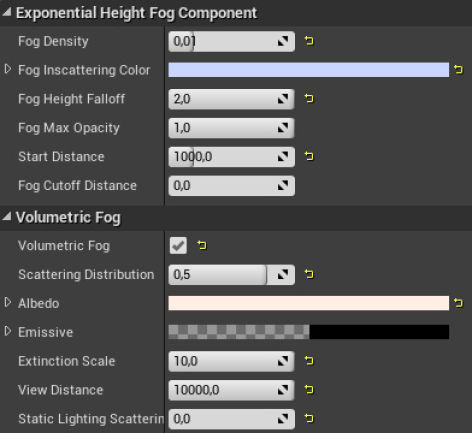
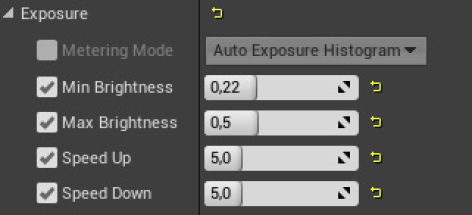
Directional light, sky light, fog, and exposure settings.
I increased Indirect Lighting Intensity on the lights because the scene turned out to be very dark and this helped to illuminate it better. The general darkness of the scene was easily the biggest challenge. Every new tree added to the scene made it even darker because the canopies occlude it so much. The worst part is you don’t know that it got darker before you bake the lighting.
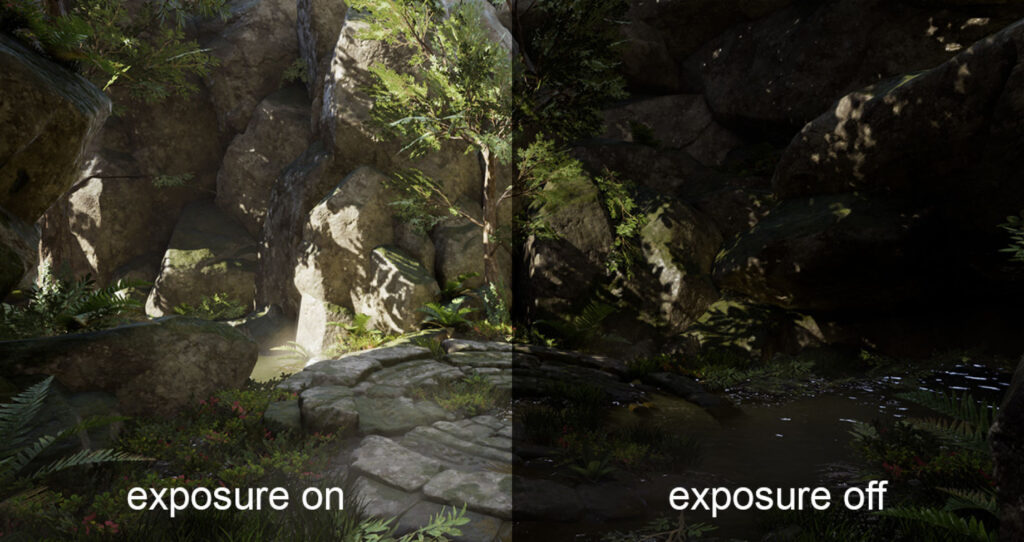
I ended up making the scene a bit wider to allow more light in and it helped a lot, the scene became less sensitive to changes. The overall brightness is controlled by Exposure.
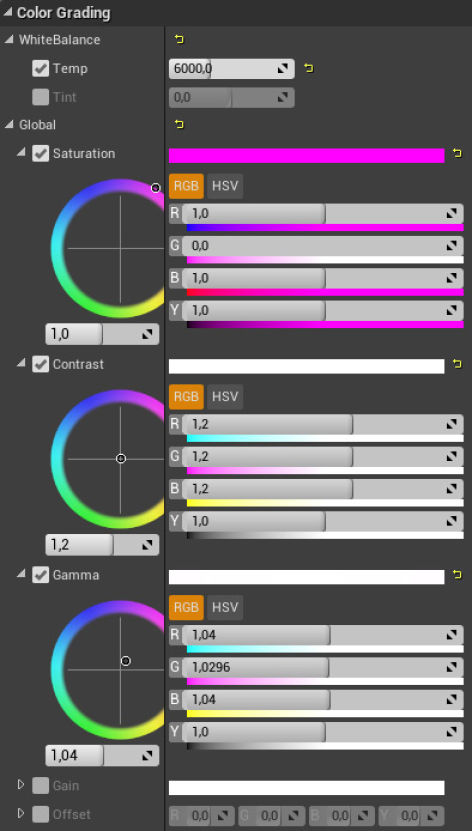
Color Grading settings
I learned a lot about lighting in UE4 from the tutorials by Tilmann Milde:
Conclusion
The whole project took me 10 weeks from start to finish. The most challenging and time-consuming tasks turned out to be making textures in Substance Designer (because I had to learn a lot to hit the quality bar), sculpting rocks and lighting the scene.
The biggest value of the course for me was an opportunity to see Jeremy’s actual process of making vegetation, the way he works with shapes and colors, the decisions he makes and so on.
Big thanks to 80 Level and CGMA for a great opportunity to share this breakdown!


