


Designing for the Physical World
Audrey Jung shows us a breakdown of her project for Themed Environment Design and tells us about the big takeaways for designing for physical spaces.
Introduction
Hi, my name is Audrey Jung, and I’m an artist from Southern California and currently live near Disneyland. I graduated from FIDM in 2009 (AA in Visual Communications) and LCAD in 2015 (BA in Entertainment Illustration). I’ve continued to take classes and workshops for plein air painting, compositional drawing, and figures since then from various instructors that I’ve admired as often as I can. I’ve been an entertainment illustrator, specifically in the mobile game (MobilityWare) and board game (Gap Closer Games) industries, for the past 6-7 years. The projects I’m most proud of are the board games because I really enjoy the restrictions of working on projects that will eventually be a physical product.
I knew that designing art that can be walked through was what I really wanted to do rather than create art that remained on a screen, as fun as that can be. I would talk about getting into theme park / themed environment design constantly but just didn’t have the knowledge of how the industry works or even where to start. That’s how I found Luc Steadman’s CGMA course at Lightbox Expo last year and knew his class would be perfect for what I needed.
Conceptual Sketching
Before this class, I would go to Disneyland/Disney World and other national parks and plein air paint/draw as much as I could. I’m fascinated by Imagineers and by anyone who can build things for the physical experience. I took woodshop for many years in high school before I knew anything about the concept design world. It was my favorite class and my teacher had a great impact on me, so I was very familiar with working with dimensions.
Luc has such a great wealth of knowledge from working in the industry for so long. I really wanted to know why theme park designers design the way they do. It really comes down to dimensions and budgets. Basically, how to make something look as awesome as you can for the budget you’re given. Sometimes you’re just not given a big budget and that’s the reality. You can’t make the same things physically as you can with CGI in movies. We’re working with real-world parameters. It’s funny how he can just look at some of my sketches and say that’s too expensive to build.
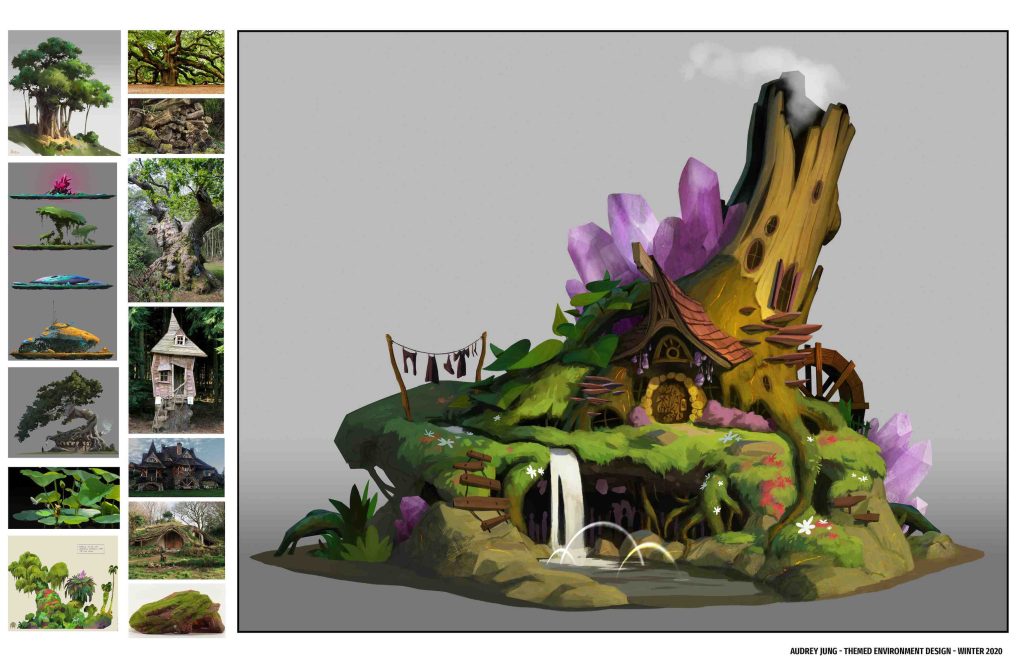
Luc had us start off with thumbnail sketches and silhouettes for our land icon. Having an interesting shape still applies to theme park design. For my theme, I wanted to do a fantasy theme with a witch who lives in a tree. He wanted us to have two different directions within the same idea, and then have variations on those ideas. We also had to have a lot of reference photos as well so that we know if/how it could be built. After that, we did a black and white value study for our more solidified idea.

Selling the Idea
For week 2, we painted our idea in color. Luc wanted me to add more detail on who lives in the tree. He emphasized on having kinetic movement, storytelling, and having multiple materials to build the environment.
Who Needs Perspective?
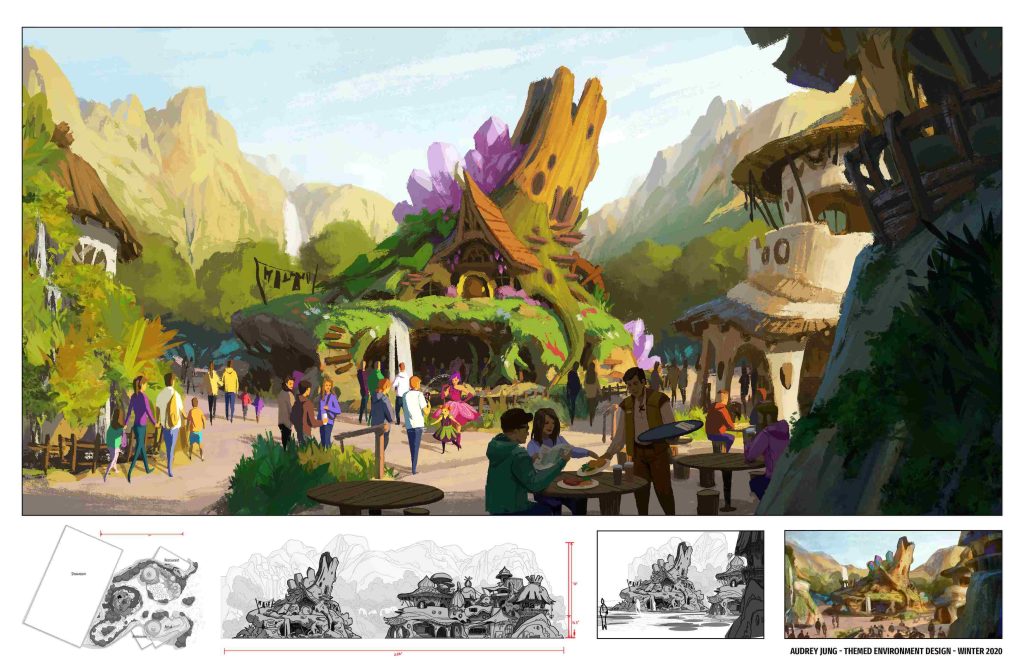
Next, we worked on elevations and floor plans of the land. This is what I love about theme park design – dimensions and parameters. Luc taught us this trick to know how large things are. What we would do is open up Google Maps and basically take screenshots of Disneyland with the distance marker since they are the leaders of the industry. We then measure out their show buildings in photoshop using the ruler tool. When I first drew out my land, I based it off of the size of Disneyland’s Fantasyland show buildings but didn’t realize that with the new technology these days, theme parks don’t build small dark rides anymore. You have to think about trackless ride systems and account for how big their show buildings are, and how to hide them. Basically, those show buildings for the new “Rise of the Resistance” ride are bigger than Fantasyland and that blew my mind. Taking things like that into consideration was very useful information.
We also had to concept the supporting buildings in the land. These eventually will be restaurants, kiosks, and retail locations. Originally, I drew my surrounding buildings at the same height as the icon of the land, but Luc had to remind me that they can’t be as tall or as important-looking as the main attraction. He also said it was cheapest to build things in rectangle buildings and use cement to mold the design around the building. So again, he taught me that there were limits to dimensions, what I could design, and how to keep it affordable for the client.
Planning Spatial Design & Leveraging 3D Massing
As someone who mainly focuses on 2D painting in traditional and digital media, I don’t have much experience with 3D programs, but Luc taught us how to use photoshop’s 3D plugin to our advantage. For those who aren’t as familiar 3D programs like me, in Photoshop, we could cut our elevation into layers and use them as “cards” and place them perpendicular to our floor plan layout. Then we could move the camera around and take “pictures” of different composition references for our Point-of-View painting later. This was very useful because you need to know if the guest can see the icon with the pathways that were designed. If a tree is in the way, move it. It also helped to know what could be seen from certain viewpoints and know where to focus details. Even though Photoshop’s 3D system is very limited, it’s exactly the amount of 3D I need for my purposes since I am going to paint over it anyway. It was quick enough that I didn’t have to build out everything, though he did show us his personal preference of using Modo and SketchUp, which may be more useful for another student.

Feeling the Experience
Next, we did black-and-white value and different time-of-day color studies to see what would sell the idea best to the client. You definitely want to pick the best scenario possible for your idea. I picked the golden hour because it brings out the color the best so that the client would know what the materials are. Eventually, I would like to do a nighttime painting since it would be equally as magical, if not more.

Final Visuals
Our last week was our final Point-of-View (POV) painting. Here is where we had to paint the background scenery and supporting elements. The painting doesn’t have to be 100% accurate to the elevation/floor plan dimensions – but at least 80%. Move things around for the best composition. Also, once you think you’re done, you’re not because you have to add people to the scene as well. It’s very important to have people look like they’re enjoying their experience and for them to have consistent lighting with the scene. Luc’s feedback was for me to add cast-members and character-meet-and-greets since you want to show as much of the potential experience as possible, so I added those as well. The goal is to sell the story and make the viewer want to be there as well.
It was pretty cool to have Luc help me understand the process of creating a themed environment, how to make my initial idea better, and how to design something like that potentially in real life.
Final Thoughts
Luc is one of the best instructors/art directors I’ve had. I’ve stayed in contact with him since class ended and got to work on a small project with him. It was cool because what he taught me in class was pretty much what he does in his studio as well. He doesn’t hold back on any industry secrets and genuinely wants you to be ready for what’s needed in the themed environment design world (or at least what’s needed for his studio).
My key takeaway for themed environment design is taking a limited budget/dimension and design it to look as awesome as you can with the limitations you’re given. I really think that’s where the creativity and resourcefulness come into play for problem-solving. From talking to Luc, other things designers should think about are what market are they catering to, what experience do they want them to have, and how long they plan on the guests being there vs. the cost of ticket and cost of running a theme park. There are so many things that go into themed environment design, and I’m glad I got to see part of the iceberg.
Some advice for future students of Themed Environment Design is to do as much of the homework to the best of your ability. Luc will help with the material you give him. Ask as many questions as you can. I took the class when everything first shut down during the coronavirus pandemic. When things open back up again, pay attention to how big things are at the Disney and Universal parks to get a better grasp of what and how to design.
This was my first CGMA class. I enjoyed the recorded video format which allowed me to replay the lecture multiple times until I understood what he wanted for each assignment. I know that this may not be the experience that every online class has, but there were only 3 of us in the class when I took it, so I got a lot of personal time with the teacher. He spent like 45 minutes per student sometimes for review and customized it to each student’s level so they could understand. I really appreciated that.
You can see more of Audrey’s work here: https://www.instagram.com/audreyjungart/
