


Chest, Shoulders, Knees, and Toes: 10 Steps to Improve Your Sculpting
When it comes to sculpting anatomically accurate human bodies, it's not as easy as 'head, shoulders, knees and toes.' 3D Artist Kristian Weinand learned a lot of technical lessons in Christian Bull's course, but his most important takeaways were irreplaceable anatomical and art fundamentals. Don't miss out on this incredible, in-depth breakdown of Kristian's week by week experience, including:
- Course Workflow
- Warm-Up
- Poses and Proportions
- Torso
- Back
- Arms
- Hands and Feet
- Body Types
- Speed Sculpting
- Final Sculpts
 Hi, my name is Kristian Weinand. I'm currently working as a 3D-Artist for XR-Experiences at the Leibniz Supercomputing Centre and as a 3D-Modelling teacher at the LMU Munich, where I also graduated from Fine Arts and Multimedia program a little over a year ago. During my studies there I specialized in 3D-Modelling and created a short animation for my graduation project. I wasn't entirely satisfied with my skill level at the time and realized I still had a tremendous amount to learn, right down to the very basics of artistic creation.


1. Course Workflow
The main focus of my art has always been characters, but I had never really sufficiently studied anatomy. So I decided to enroll in Anatomy for Production class with Christian Bull at CGMA. Over the course of ten weeks, we had to create at least one entire human model in an anatomical pose. This meant building it up from a basic proportion blockout over the skeletal system, muscles, fat, and skin. Each week, we focused on a different body part, starting with the bones, then adding muscle. We worked in ZBrush and used basic sculpting techniques, simple shapes for the blockouts, then mostly working on separate pieces, adding muscle masses where needed.
Something very important that I learned from the class was no matter how good you get at using any kind of specific software, it is still the most important thing to know your solid fundamentals.
Kristian Weinand, 3D Artist
I wanted to make the best of the class and decided to create four human models, male and female both in anatomical poses, plus another more dynamic pose. I consider my male posed model to be my main project from the class as I picked a really dynamic pose for him that was definitely the hardest one to do. But it was also the most fun project and I loved the tension and expression in the pose right from the beginning when I found the reference for it.
2. Warm-Up
The first week's exercise was very fun and liberating. Christian provided some models of made-up skeletal structures, nothing that reflects actual existing anatomy. We were supposed to think about functional anatomy and place muscles on the bones accordingly. We learned about antagonistic muscle groups and basic organic design principles. The results among the students were very diverse and it was interesting to see what everyone came up with.

Christian used this week to give us some basic understanding of how anatomical shape language works and how we make our sculpts look natural. He gave us tips like avoiding completely parallel lines, losing and finding lines, all things that I didn't really do sufficiently in these sculpts but it helped loosen up a bit and get in the sculpting mood.
3. Poses and Proportions
The second week was about a simple proportion blockout to test poses and get proportions about right. So we already had to pick our poses at this stage. Proportions are something that I usually eyeball, so this basic lesson was very valuable for me.
I also used the second week to sculpt faces for my models. Faces aren't part of the course (there's a different class for that at CGMA) and they are definitely so complex that they deserve at least another ten weeks of extra study. Still, I would have liked to go over that a bit more in this class. The calm face for the anatomical pose didn't fit the posed male sculpt anymore at a later stage to the point that it got almost comical (as you can see below), so I made another head for him later.
Explore Character Facial Sculpting for a focus on head details.

Reference is massively important for anatomy (as for any other topic to be precise). I had a huge PureRef-File that contained everything Christian provided for us as well as other drawings, sculpts from other artists and photos for various body parts. You can add your own references, but be careful. PureRef can handle a lot but if there are too many images in there it'll start lagging.
4. Torso
The next two weeks were about the torso, the chest, abdominal area, back, and neck. You usually don't get to sculpt too many skeletons, so I wanted to use this chance to learn a bit more about the shapes of the vertebrae and such. Even if it doesn't really help the overall shape later it's still super fascinating to study how complex our body structures actually are.

The video lectures on this and the following weeks were massively detailed and valuable. Christian was able to point out details that I very likely wouldn't have spotted on my own. Things like at what angle the muscles are arranged on the limbs, what structures give shape to the back, which shapes will actually be visible, and which will in most cases be covered by fat or will just be very thin.
5. Back
The back was something that I never really understood before. For example, the latissimus dorsi is the very flat but large muscle that you will always see in anatomical drawings. However, it's very thin so it actually doesn't show by itself. BUT it will let you see the underlying structures, like the lumbar muscles.

Check out ".
Another structure that gets easily overseen because it lies underneath is the rhomboids. They attach to the spine and the shoulder blades and lie underneath the trapezius but they are very visible in certain poses when pulling the arms backward and the shoulder blades together. Those things are super important but a bit hard to learn without good guidance with an experienced eye. In the assignments for each week, he repeated what to especially look out for while working on the specific areas, which helped focus on certain important parts.
6. Arms
The next four weeks were about arms, hands, legs, and feet. Again with the same approach, first refining the bones, then adding the muscles afterward. The arms and legs are areas that I still struggle with, especially the lower regions. There are just so many small muscles that it's hard to memorize and when the forearms are twisted it gets crazy. But it's manageable with good reference and some time to wrap your head around what's going on where.

You might think that those many little muscles aren't visible anyway but it's the small details that might still be seen, like the ridge of the ulna, or where the triceps turns into the tendon, that adds so much realism to the model. A thing I learned here was the importance of a good silhouette and how the muscles form it. Which muscles have more volume, which turns into tendons at what point and where the specific muscle starts on the bones.

One thing I learned and had always overlooked somewhat in my prior anatomy studies was the influence of bone on the shape of about every structure on the human body. Of course, bone shapes the entire body and holds everything where it's supposed to be but I completely neglected that some parts of the body are almost entirely a bony mass.
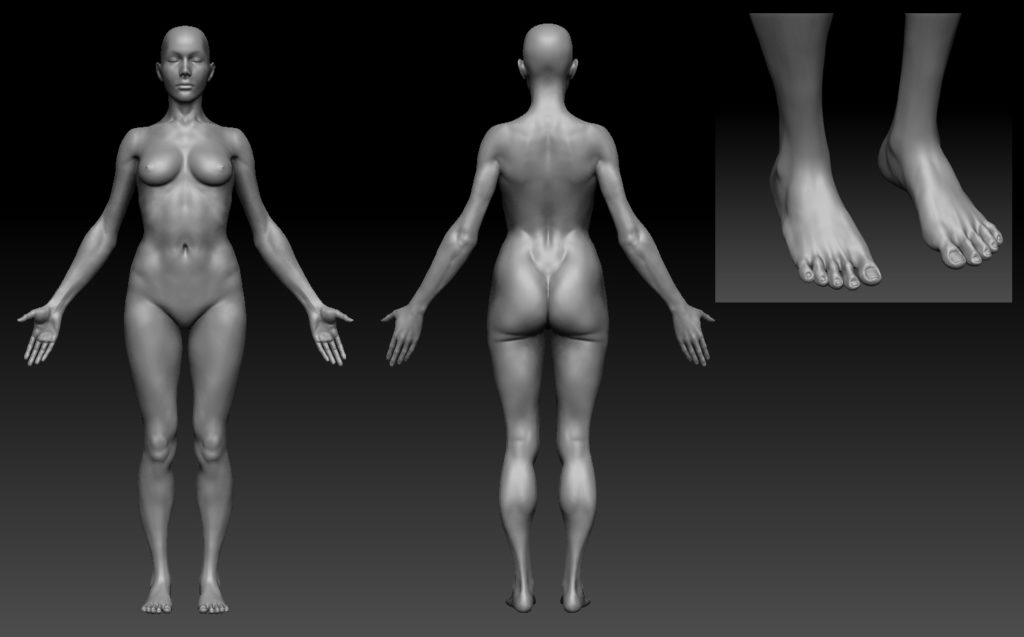
7. Hands and Feet
Hands and feet are always parts that people seem to struggle with. For me, it was especially the feet, because I hadn't really studied those properly before. You usually need to give a character hands when drawing or sculpting, but feet are just hidden in shoes most of the time. But with the workflow we used here, bones first, then muscles on top, I realized that hands and feet are both very bony structures, so once you got the bones about right, you were about 80% there and it was actually almost easy.
The same thing for the rib cage, it shapes the entire upper body. The hips are somewhat different though. You see some bony parts poking through to the skin, like the iliac crest and the ASIS (anterior superior iliac spine) and PSIS (posterior superior iliac spine) but overall the bone is pretty much hidden with large muscle and fat masses on top. But it was still super interesting to study how hip bones are shaped. Humans have crazy complicated hip bones and that was definitely one of the more difficult areas to sculpt.
It's also funny how you start to look at people differently and marvel at the wonders of human anatomy in your daily life while studying anatomy intensely.

Christian's lecture videos were fantastic. He first explained the bones and muscles using color-coded drawings, then he proceeded to show the just mentioned skeletal and muscle structures on very patient and professional live models, which was very valuable. He had a male and a female model and later even some more models for different body types. On the models, he could also show how muscles change in motion and how they behave in different positions, which was fantastic.
After that demonstration he proceeded to sculpt the bones and muscles, exactly explaining what he was doing. I was very impressed that Christian didn't use symmetry at all while sculpting. It definitely adds to the practicing effect but I didn't do that, my sculpts are entirely symmetrical (except for the posed ones).
Read "6 Ways an Expert Artist Can Enhance Their Figure Drawing" to see how a 2D artist tackles hands and feet.
8. Body Types
Week number nine was very interesting. We took our finished sculpts from the last week and changed the body types by varying the amounts of body fat and muscle mass. It was actually faster and easier to do than I expected because all the groundwork had already been done. I just had to add fat in the right areas, add muscle mass or carve away a bit of it. We did this with layers and morph targets, so we could use the sliders to see the before and after and everything in between. I made four more body types for the male anatomical pose and one for the female.
USE THE ARROWS TO SCROLL THROUGH KRISTIAN'S BODY TYPES.


And of course, this doesn't cover the extent of variation in human body shapes, the bone structure and overall proportions stayed the same for all of these models. And here it was also quite interesting to see how drastically a body can change while keeping the same skeleton. It's practically the same people under very different living conditions.
9. Speed Sculpting
Week number 10 was the last week of the class and we were supposed to finish all our sculpted figures. But this week wasn't any less challenging than the rest. Our second assignment was to take everything we had learned over the class and apply it to yet another new human figure in a speed sculpt. Christian said it shouldn't be more than three hours if I remember correctly but I didn't like my result after three hours enough to present it, so I took another one to two hours to get it to a level that I was satisfied enough with to show. I actually planned to finish it properly after the class but haven't done so until now. It was yet another dynamic pose with a lot of tension, I guess I just like those the best.

10. Final Sculpts


Final Thoughts
- First of all, I have to say that it was an amazing course with an excellent instructor. Christian's always very calm and took his time to properly explain all the areas of the human body in detail. Of course, the topic is ultimately complex and there's always something that will not be covered but overall I'm very satisfied with the class and what I got from it.
- Christian's feedback was also very valuable, probably the most important part of every CGMA class. Christian really took the time to look at the models and sculpted over them quite a bit. I have to say he's an amazingly invested teacher and I highly recommend taking his class if you're thinking about doing so.
- The lectures were very long each week, something around three hours but packed with knowledge and providing that in three different forms. This is not the only class I've taken at CGMA but it was definitely the one with the longest video lectures and the most effort going into producing them I would say.
- As I already mentioned I would absolutely recommend taking the class if you're thinking about it. It's definitely intense, so you should be able to make room for it in your schedule. Something that I really like about the CGMA classes is that you get assignments with strict deadlines every week, so you have to get things done on time. I'm never as productive as when I'm taking a class. So it's also exhausting, but it's definitely worth it.
- Something very important that I learned from the class was no matter how good you get at using any kind of specific software, it is still the most important thing to know your solid fundamentals. Software changes over time and you'll always have to adapt to an ever-changing environment. But what will always stay with you is your fundamentals.
- I've also taken the Animal Anatomy class at CGMA a few months after this class and it was especially interesting to see how basically the same anatomical structures vary on humans and other animals. We all share the same anatomy, it's just a bit different on every animal. It was a very enriching experience to study these things thoroughly in both of these classes.


LEARN MORE
CGMA provides comprehensive instruction for Art, Games, and VFX industries in a variety of courses for a range of students, from 2D and 3D artists looking to supplement their college studies to industry professionals looking to stay up to date on emerging trends and techniques in the field.
RELATED LINKS
Explore Character Facial Sculpting for a focus on head details.
Enroll in Figure Drawing: Anatomy of Style for a 2D perspective.
Read "6 Ways an Expert Artist Can Enhance Their Figure Drawing" to see how a 2D artist tackles hands and feet.
Check out the Animal Anatomy course Kristian took!
