


6 Steps to Create Weapons for Games: 1 Process for 2 Guns
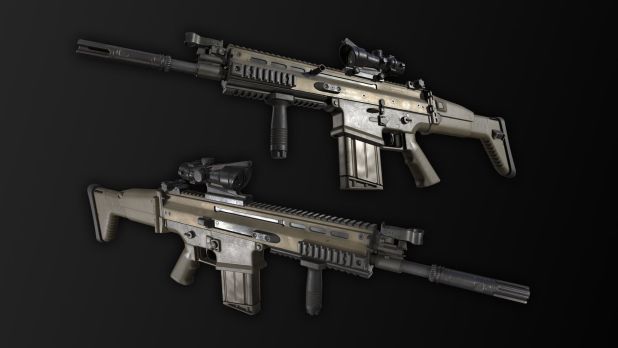
Freelance Hard Surface Artist Cohen Brawley modeled both the Springfield XDM and SCAR-H. During production, Cohen thought of every detail, from hand drawing specific textures to researching the best angles to pose the weapons. Read on to see his complete break down of modeling production-quality props.
- References: From Angles to Details
- Blockout: The Foundation
- High-poly: Balancing ZBrush and 3ds Max
- UV Unwrapping: What to Mirror
- Texturing: The Old Meets the New
- Rendering: Consider the Animation
 Hello, my name is Cohen Brawley and I’m 17 years old. My dream career is to be a Weapon Artist. I modeled my first weapon a year ago by watching a popular AKM tutorial. I've been hooked on 3D Modeling Weapons ever since. Since I grew up in an Oklahoma ranching environment, as well as participated in shooting sports, I had firsthand experience with firearms and how they operate. I feel this real-world experience and my interest in firearms assists me with 3D modeling weapons.

1. References: From Angles to Details
During the first week, we were given a list of weapons to choose from. After selecting the weapon to model, I began gathering reference images, which is a very important step before modeling a weapon. When gathering reference images of a weapon, I look for various side angles as well as a few diagrams of the disassembly.
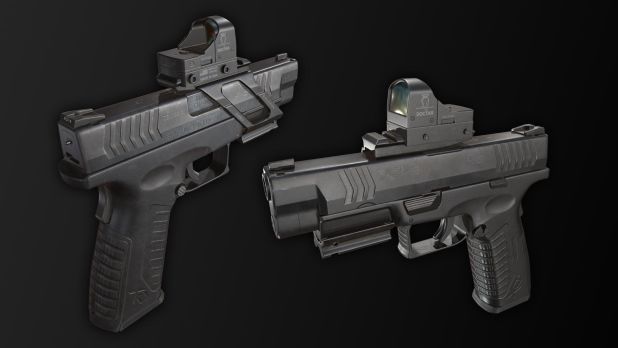
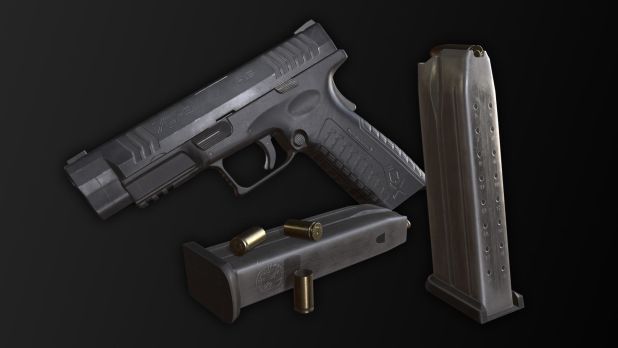
Springfield XDM Reference Board:

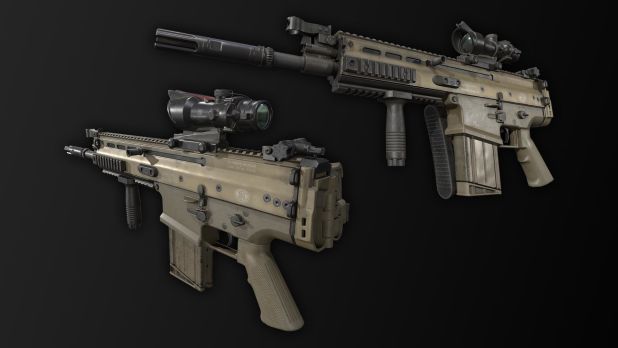
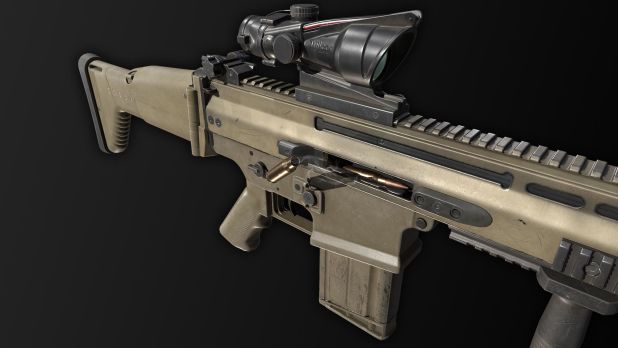
FN SCAR-H Reference Board:

Once I finish gathering all of the reference images I need, I begin creating a blueprint of the weapon in Photoshop.


I get measurements of the Weapon from multiple sites to make sure they are accurate. I’m careful not to use skewed images for my blueprint, as they could cause the weapon model to become skewed as well.
Explore Cohen's Urban Warfare work from CGMA's UE4 Modular Environments course.
2. Block Out: The Foundation


When working on the block out of the weapon, I use simple shapes to help get a good feeling of the proportion of the weapon. It allows for quick and easy changes if some proportions don’t feel right. The block out is a very important stage, like the foundation of a house.
You start a sketch with simple shapes before you add a lot of details. Sketching with simple shapes allows you to make quick changes if something doesn’t look right. In comparison to a sketch, the block out wireframe isn’t optimized and can have quite a few edge loops— just as a sketch may have unerased guidelines and marks.
When modeling a weapon for an FPS, you only need to model the parts seen by the player. There is no need to model the internals of the weapon unless they are going to be seen from an animation. Parts that will be animated to move on the weapon must always be separate from parts of the mesh.
3. High-poly: Balancing ZBrush and 3ds Max

After I had correct proportions, I added the details that would be accounted for on the low-poly. Once I finished those details, I duplicated the model and added it to a new layer group call High-poly.
In High-poly, I added the support edges and elements to the model that will be needed when I Subdivide the mesh in ZBrush. Balancing 3ds Max and ZBrush is a pretty smooth workflow. I just selecting the mesh and exported it from 3ds Max into ZBrush to perform the tasks required, then exported it back into 3ds Max. That's it!
Learn how to master Zbrush in CGMA's ZBrush for Concept and Iteration course
4. UV Unwrapping: What to Mirror


Before I start UV Unwrap, I always apply a UV Grid. The UV grid helps a lot when unwrapping because the squares will look skewed if something wasn’t unwrapped correctly, which highlighted any mistakes. The numbers and letters also help show if the UV is flipped.

When it was time to unwrap the UVs, I checked around my model and looked for areas that could share UVs. When I found a good candidate for sharing UVs, I applied a Green Material to it and detached it from the mesh to save it for later mirroring. Don’t share UVs when text will be applied to the UV, or the text will be flipped. Be cautious of sharing too much because if there is one large unique scratch on one side of the weapon, it will appear on the other side too.
I started UV Unwrapping pieces one by one. As I was using 3ds Max, I also used a script called TexTools. TexTools is a very helpful script for 3ds Max users. When UV packing, it’s better to manually pack them by hand than to rely on software. When I pack the UVs, I always try to make them as tight as I can. I don’t pack them too tight, because when the weapon is in engine mipmapping will scale the textures down. If the UVs are too close, the Mipmapping can cause the UVs to bleed onto one another.
5. Texturing: The Old Meets the New
We used Substance Painter to texture our weapon. Honestly, Substance Painter is probably one of my favorite software out there. No other texturing software can compete with it! Naming the folders in Substance Painter and keeping them organized was very important.

When texturing my weapons, I created properly named folders and organized them with the materials they will contain.
Once I started texturing my weapon in Substance Painter, I created a folder called metal and then added a mask to the folder, selecting everything on the weapon that is metal. I incorporated different types of metal materials to help give it nice material breakups.

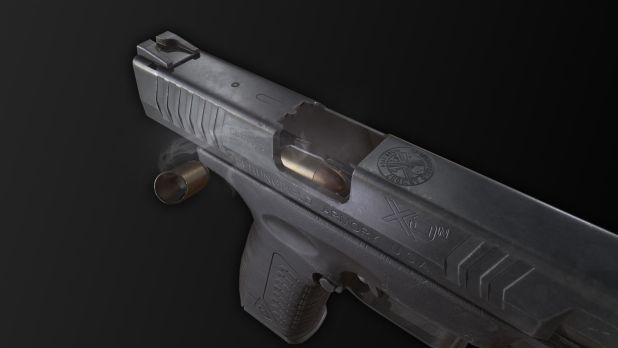
I did the same process for plastics, and added materials until all of the elements on the weapon have a proper material on it. When finished, this will give the weapon the appearance as if it was in mint condition.
Using reference images of the weapon in very poor condition, I created the grime and wear while keeping a balance between new or worn. This included other details like edgewear and dirt. I try not to rely on generators and if I ever do, it’s for subtle details like light edgewear/dust.
I use a lot of stencils to add paint chips, scuffs, and scratches. For areas that will have lots of harsh edgewear, I took the time to hand paint it, rather using an edgewear generator.

Once I finished the main details, I added text and patterns using an alpha map I created in Photoshop. It’s better to apply text and patterns in Substance Painter and have the ability to tweak them, versus having text baked straight onto the weapon.
Substance Painter and Marmoset render quite differently so it was a bit difficult to match exactly what I saw in Painter to Marmoset. At the end of texturing, I imported the model and textures into marmoset and updated the textures. Then I tweaked them in painter to yield to Marmosets Render.
Make use of Substance Painter in CGMA's Advanced Substance for Environment Art course
6. Rendering: Consider the Animation
I always consider the animation when I am modeling, baking and even texturing. I am always aware of the parts’ functionality and what will be exposed when that part moves from its current location to another.


Trying to get the right angle on the weapon can be very difficult. Not only are you wearing the boots of a 3D Artist, but also a photographer. My strategy is to look up photos of weapons being showcased, which helps me get good ideas of the best angles.
When I take a screenshot, I save the Marmoset scene as SpringfieldXDM_Screenshot01, for example. That way if I need to retake the photo, the lighting and position are in the same location as when the screenshot was first taken. Ethan taught us a lot of these very helpful techniques throughout the course.
Here are my weapon projects on Artstation:
Springfield XDM
FN SCAR-H
Final Thoughts
- When I first learned of CGMA’s “Weapons and Props for Games” course taught by Ethan Hiley , I knew it was the course I needed. Weapon 3D modeling is very specialized. To learn from the artist that models weapons in my favorite shooter games, is not something I ever thought possible. I ended up enrolling twice in Ethan’s Class because I wanted to perfect my skills.
- Ethan is equally talented as an instructor, as he is a Weapon Artist. He has an unbelievable eye for detail, as well as the passion and knowledge to help you level up!
- Each Weapon provided its own unique challenges and learning opportunities.
- I have become a big fan of CGMA and the classes offered. It’s such an awesome opportunity to be taught by industry professionals who know their stuff. The confidence of knowing that the information and skills I am taught are of AAA standards is flat-out priceless.
\LEARN MORE
CGMA provides comprehensive instruction for concept art, illustration, and entertainment design in a variety of courses for a range of students, from 2D and 3D artists looking to supplement their college studies to industry professionals looking to stay up to date on emerging trends and techniques in the field.
RELATED LINKS
Explore Cohen's Urban Warfare work from CGMA's UE4 Modular Environments course.
Learn how to master Zbrush in CGMA's ZBrush for Concept and Iteration course.
Make use of Substance Painter in CGMA's Advanced Substance for Environment Art course.


